Add next in . Do NOT use www. for the new_domain Maria's Blue Crayon: February 2018

Wednesday, February 28, 2018

Crochet Easter Bunny Shaker - Free Pattern

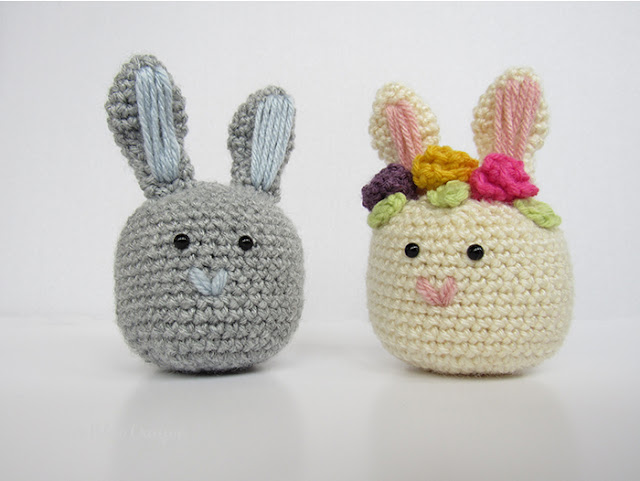
Last year I made darling little Easter Chicks that made noise - I called them Easter Chick Shakers! This year, I took the same concept and made cute little bunnies! These crochet bunny shakers are perfect for Easter baskets!


Or scroll down for the free version!

When I was making these bunnies, I made the base/head the same as the Easter Chick Shakers. They are large enough for a plastic Easter egg (filled with rice, beans, beads, etc.) to fit inside along with stuffing to make fun little noises for kids.


At first, I made a very simple bunny - added some eyes, a nose, and ears. When I started gathering everything together to put it in this blog post, I decided it needed a little something extra.

I decided to give my 'girl' bunny a flower crown. Isn't she darling?! I think it adds such a cute detail. Of course, you can always keep your bunnies plain Jane - they're just as cute!

If you are enjoying the Easter Bunny Shakers, be sure to check out the free pattern for the Easter Chick and Unicorn Variations!

I think the flowers add such a nice touch to the bunny and it's a great way to use up a bit of your scrap yarn in what ever colors you have! I had a lot of fun picking out colors for the flowers as I have quite a bit of scrap yarn.


I made the 'boy bunny' a plain Joe.  I did play around with a bow tie and a hat, but sometimes plain and simple can make it just right! The bunnies without any flair are especially easy and quick to work up! You can make a whole bunny family for your kiddos and they will love them!

These little bunnies are so fun and cute for Easter baskets! Especially for young ones who don't necessarily need a full basket of candy. Heck, they're great for anyone! They're super cute and fun with their little shakers inside.


Pattern

Materials
Worsted weight yarn 
(I used Lion Brand Vanna's Choice in Fisherman, Pink, Silver Heather, and Silver Blue. For the flower crown I used scrap yarn I had in worsted weight.)
G/4.00mm hook
F/3.75mm hook
6mm safety eyes
Small plastic egg and beads/beans/rice (optional shaker)
Tapestry needle
Scissors

Amazon Picks


Notes

Invisible decrease - work a decrease as you normally would, except only use the outer loops
*decreases in this pattern will be single crochet decreases

Single crochet triple decrease is worked as follows: insert hook in first stitch, pull up a loop, insert hook in second stitch, pull up a loop, insert hook int third stitch, pull up a loop, yarn over and pull through all loops on hook

Abbreviations (US terms)
Ch = chain, sc = single crochet, st = stitch(es), sk = skip

Bunny Head G/4.00mmhook

Row 1: Magic ring, sc 8 in the ring, join to first sc (8)

Row 2: 2sc in each st around, join to first sc (16)

Row 3: *sc, 2sc, repeat from * around, join to first sc (24)

Row 4: *sc in next 2 st, 2sc, repeat from * around, join to first sc (32)

Row 5: *sc in next 3 st, 2sc, repeat from * around, join to first sc (40)

Row 6-16: sc in each st around, join to first sc (40)

Row 17: *sc in next 3 st, invisible decrease, repeat from * around, join to first sc (32)

Row 18: sc in each st around, join to first sc (32)

At this point you will want to attach the eyes.  Place the eyes between rows 14 and 15.
Sew on the nose of the bunny between rows 10 & 13.

If you would like your bunny to be a shaker, you will also want to place your small plastic egg and stuffing inside the chick at this point and continue to stuff as you go.

To make the shaker inside, I took an empty small plastic Easter egg and filled the bottom portion with rice. I used beans and beads for the other two. You can fill it with what ever you have laying around the house that will make noise when you shake the egg. I used packing tape to make sure the content stayed inside and then placed it in the chick with the poly-fil.

Row 19: *sc in next 2 st, invisible decrease, repeat from * around, join to first sc (24)

Row 20: sc in each st around, join to first sc (24)

Row 21: sc in next st, invisible decrease, repeat from * around, join to first sc (16)

Row 22: Invisible decrease around, join to first sc (8)

Fasten off, make sure you have enough poly-fil/stuffing inside and then sew up the hole. I didn't stuff mine too tightly, I wanted to make it soft and squishy.


Bunny Ears F/3.75mm hook

Round 1: Magic ring, 4 sc in ring, join to first sc (4)
Round 2: Ch 1, 2 sc in each stitch around, join to first sc (8)
Round 3: Ch 1, sc around, join to first sc (8)
Round 4: Ch 1, *2sc, sc, repeat from * around, join to first sc (12)
Round 5-6: Ch 1, sc around, join to first sc (12)
Round 7: Ch 1, *sc, invisible decrease, repeat from * around, join to first sc (8)
Round 8-11: Ch 1, sc around, join to first sc (8)
Fasten off and leave tail to sew onto head.
Using the same color yarn as the bunny nose, use a tapestry needle to create the inner coloring of the ear. Use a running stitch to sew on the inner ear color, fasten off and push tail end into the center of ear.

Make 2 and sew onto top of bunny head

Flower Crown F/3.75mm hook

Make 3 flowers and make 3 leaves. Sew the leaves on first then sew on the flowers.

Leaf

Ch 4, sc in second chain from hook and across, turn
Ch 1, triple sc decrease, fasten off

Flower

Ch 16, (sc, ch 1, sc) into 2nd chain from hook, *sk 1 st, (sc, ch1, sc) in next st, repeat from * across
Fasten off. Roll up the row of crochets to create the flower. Use the yarn end to sew through the bottom of the flower and onto the bunnies head.


Labels: ,

Monday, February 26, 2018

In Stitches - Best Free Crochet Pattern Party Link Up Week 3

Find the best free crochet patterns here at the In Stitches Link Up Party!


There are a lot of fun patterns in this week's Top 5 best free crochet patterns!  Find all the free patterns linked below!

  1. Crochet Easter Chicks by Yarnhild
  2. Briar Beanie by Meghan Makes Do
  3. Revel (Whoopee Hat) by Noowul
  4. Snow Drop Mittens by Left in Knots
  5. Mandala Cowl by Crafty Tutorials


Every Monday, you will find 5 Free Crochet Patterns here on the In Stitches Link Party! What a great little treat for your Monday! You will also find the host's (of this link party) newest free crochet patterns on our blogs! Technically, that's 10 crochet patterns for you to check out!

If you are a crochet blogger that has free patterns to share, this is a great party for you to get your work out there! Simply follow the instructions below to 'link up' your free crochet patterns each week. If you are in the top 5 (most clicked patterns), your pattern will be shared and promoted by all of the crochet bloggers hosting this party! You can find more details below.

I am hosting this link up party right here on Maria's Blue Crayon, as well as on, Nicki's Handmade Crafts, Naztazia, Salty Pearl Crochet and The Unraveled Mitten. We are really excited to start this link up party and hope you join along!

Find our most recent free crochet patterns on our blogs!

Be sure to check out our social media pages and follow us for more crochet patterns and inspiration!


Ready to join In Stitches - The Best Free Crochet Pattern Party?


Want to add your link? Please remember to link to your actual project URL and not your homepage URL, and use the name of your project or post, not your own name. Just click the blue “Add Link” button below!

Please visit at least one other link, you just might find a new favorite project! AND – your clicks are how we determine which projects to feature each week! Feel free to leave a comment at the pattern link to provide feedback and show support.

No Etsy stores, Facebook pages, giveaways, or other link parties. Just blog posts to your actual crochet patterns that are accessible for FREE!

If your project gets featured as a top link, please do not submit that same project to future parties. We want to party fair! :)

Now let's get this party started! Please remember that the links below are shown in random order and are not shown according to when they were submitted or how many votes they received so far.


Labels: ,

Monday, February 19, 2018

In Stitches - Best Free Crochet Pattern Party Week 2 Link Up Party

This week, we have our first top 5 best free crochet patterns!


Check out the Top 5 Best Free Crochet Patterns for last week's link up!


  1. Small Flower Applique by Crochet n Create
  2. Rusc Crochet Hat by Noowul Designs
  3. Adorable Crochet Mouse by Yarnhild
  4. Frosted Berry Infinity Scarf by Left in Knots
  5. Cranberry Twist Slouch by Kirsten Holloway Designs


If you aren't familiar with link parties, don't worry, I'll fill you in! Basically, each Monday we will share 5 top free crochet patterns from the free patterns we have gathered throughout the week. Be sure to subscribe to get these patterns right to your email!

If you are a crochet blogger that has free patterns to share, this is a great party for you to get your work out there! Simply follow the instructions below to 'link up' your free crochet patterns each week. If you are in the top 5 (most clicked patterns), your pattern will be shared and promoted by all of the crochet bloggers hosting this party! You can find more details below.

I am hosting this link up party right here on Maria's Blue Crayon, as well as on, Nicki's Handmade Crafts, Naztazia, Salty Pearl Crochet and The Unraveled Mitten. We are really excited to start this link up party and hope you join along!

Find our most recent free crochet patterns on our blogs!

Be sure to check out our social media pages and follow us for more crochet patterns and inspiration!


Ready to join In Stitches - The Best Free Crochet Pattern Party?


Want to add your link? Please remember to link to your actual project URL and not your homepage URL, and use the name of your project or post, not your own name. Just click the blue “Add Link” button below!

Please visit at least one other link, you just might find a new favorite project! AND – your clicks are how we determine which projects to feature each week! Feel free to leave a comment at the pattern link to provide feedback and show support.

No Etsy stores, Facebook pages, giveaways, or other link parties. Just blog posts to your actual crochet patterns that are accessible for FREE!

If your project gets featured as a top link, please do not submit that same project to future parties. We want to party fair! :)

Now let's get this party started! Please remember that the links below are shown in random order and are not shown according to when they were submitted or how many votes they received so far.


Labels: , ,

Sunday, February 18, 2018

Crochet Shag Throw Pillow Free Pattern

Can you crochet a shag throw pillow? The answer is yes - and the best part?! It's so easy and I have a free pattern for you to follow!


I worked with Lion Brand's Fun Fur years ago to make Grand Poobah hats that I sold on Etsy, so I knew the ins and outs on how to use this yarn to really make it 'work'. Crocheting with the Fun Fur alone is rather difficult, so the trick is to pair it with Vanna's Choice yarn in a similar color.

Pairing the Fun Fur and worsted weighted yarn makes it very easy to work with and still keeps it a pliable fabric. The Fun Fur takes over the worsted weight in a sense, so you are left with a fuzzy, shaggy, and fun fabric!


I have been seeing a lot of faux fur and shag throw pillows out there that are just gorgeous. I thought it would be fun to make my own version using Lion Brand's Fun Fur. It's such an easy project and I even made it so the pillow cover is easy to take on and off.

How easy is this project? You only need to know how to double crochet and single crochet. It's THAT easy and you're left with a pretty pillow that is sure to spruce up your home decor!

I made my shag pillow in a gray color to go with my Mint to Be Afghan that I put on my sofa. I think this shag pillow would look very pretty in a cream color or even in a light shade of pink!

Save it to your Ravelry for later!

PIN it to your Pinterest boards for safe keeping!

Pattern

Materials
J/6.00mm hook
Tapesty needle and Scissors
16" square pillow form

Notes

The pillow cover will be made in three pieces and then crocheted together.

The pillow cover pieces will be made by holding the Fun Fur and Vanna's Choice together while crocheting. 

Gauge: 4" x 4" ~ 10 st x 5 rows in dc

Abbreviations (US terms)
Ch = chain, sc = single crochet, dc = double crochet, st = stitch(es)

Pattern

Crochet holding the Fun Fur and Vanna's Choice yarn together for all 3 pieces

Main Piece

Row 1: Ch 42, dc into 3rd ch from hook and across, turn
Row 2-21: Ch 2, dc in each st across, turn
Fasten off

Half piece (MAKE 2)

Row 1: Ch 42, dc into 3rd ch from hook, turn
Row 2-12: Ch 2, dc in each st across, turn
Fasten off

Assembly

You will have three crocheted pieces to put together. First you will need to place your pieces on top of each other.


The largest piece will be laid down first. (Shown outlined in pink)


Next put one of the half pieces on and match it up to top. (Shown in yellow)


Put the other half piece on and match it up to the bottom. There will be overlapping of the half pieces. Laying the pieces together this way and joining them together will produce an envelope type pillow cover.


Secure all pieces together with stitch markers to make it easy to join all pieces together. I placed a stitch marker in each corner and where all 3 pieces meet on the sides.


Starting at one corner, attach just the worsted weight yarn and single crochet evenly around. Make sure to make 3 single crochets into each corner.

Now the pillow cover is seamed together and you will have a space in the middle to put your pillow inside. Turn it inside out. This will be the 'right side'. I weaved in only the ends that I could see on the 'right side'. I left the tails inside as is because I won't see them. You can weave them in if you'd like.

Place you pillow inside. I had to stretch my fabric a bit since my pillow was so plump and fluffy. Once I stretched it, it fit nicely. If it continues to sneak up and don't cover the pillow on the back side, sew a few buttons on to keep it closed.

Labels: , ,

Monday, February 12, 2018

In Stitches: The Best Free Crochet Pattern Party - Week 1 Link Up Party


Welcome to the first week of In Stitches - The Best Free Crochet Pattern Party! I say 'our' because I have teamed up with four other amazing crochet designers to create a way to find and promote other amazing crochet designers! We are calling the party "In Stitches - the best free crochet pattern party" because it's just that! We will be sharing the best free crochet patterns weekly.

If you aren't familiar with link parties, don't worry, I'll fill you in! Basically, each Monday we will have 5 top free crochet patterns from the free patterns we have gathered throughout the week. If you are following along for the free crochet patterns, that's it! You will find 5 free crochet patterns each week to enjoy!

If you are a crochet blogger that has free patterns to share, this is a great party for you to get your work out there! Simply follow the instructions below to 'link up' your free crochet patterns each week. If you are in the top 5 (most clicked patterns), your pattern will be shared from all of the crochet bloggers hosting this party! You can find more details below.

I will be hosting this link up party right here on Maria's Blue Crayon, as well as on, Nicki's Handmade Crafts, Naztazia, Salty Pearl Crochet and The Unraveled Mitten. We are really excited to start this link up party and hope you join along!

Since this is the very first week, we will be sharing each of our own newest and free crochet patterns!
All the pattern links are below! Enjoy!


Be sure to check out our social media pages and follow us for more crochet patterns and inspiration!


Ready to join In Stitches - The Best Free Crochet Pattern Party?


Want to add your link? Please remember to link to your actual project URL and not your homepage URL, and use the name of your project or post, not your own name. Just click the blue “Add Link” button below!

Please visit at least one other link, you just might find a new favorite project! AND – your clicks are how we determine which projects to feature each week! Feel free to leave a comment at the pattern link to provide feedback and show support.

No Etsy stores, Facebook pages, giveaways, or other link parties. Just blog posts to your actual crochet patterns that are accessible for FREE!

If your project gets featured as a top link, please do not submit that same project to future parties. We want to party fair! :)

Now let's get this party started! Please remember that the links below are shown in random order and are not shown according to when they were submitted or how many votes they received so far.


Labels: ,

Sunday, February 11, 2018

Mint to Be Crochet Afghan Free Pattern

Over the last month, I've made the best easy crochet afghan with Lion Brand's Scarfie Yarn.  I'm so in love with this "Mint To Be" afghan - it's a perfect throw for my sofa and the colors are so pretty! The Scarfie yarn I chose to use was definitely 'mint to be' made into an afghan. ;)

Lion Brand was generous enough to send me Scarfie yarn to complete this crocheted afghan.  I chose the color way 'Mint Silver' because I couldn't pass up some color mixed with a pretty neutral! The color transitions are very smooth and the result is a pretty striped effect.


When designing this blanket, I knew I wanted to create something that was easy to make.  I also wanted to crochet something that I wouldn't get bored of in the middle of making. Making larger afghans can become tedious and get set to the side and forgotten about. (Or maybe that's just me!)

With the flawless color changes in the Scarfie yarn, it kept me motivated to keep crocheting to see the final outcome and color transitions! I stuck to basic stitches and chose to use the 'spider stitch'. To create a nice drape to the afghan, I used a larger than recommended hook size so it would be light and cozy.


I'm not sure if it was the Scarfie yarn, my Clover Amour hook, or a combination of both - but this afghan was heaven to make! The yarn was so soft and the Clover Amour hooks glide so effortlessly, it was such a joy to make! I think those were big factors as well in motivating me to finish this blanket without putting it aside.

Using small stitches can become time consuming, but with the larger weight of this yarn and a larger hook size, I was able to crochet about half a skein (sometimes more) each night until this blanket was complete. In total, it only took a little less than two weeks to complete this blanket - time well spent and half way through I got to use it while crocheting. :)


The result of the blanket is a breath of fresh air. The colors are so pretty and the stitch compliments the yarn so nicely. My favorite thing about it is how light and airy, snuggly, and warm it is! This was intended to be a throw for our sofa, but I'd be lying if I said I didn't take ownership of it myself. (As I'm typing, I have it wrapped around me with a cup of something hot close by!)


Save it to Ravelry for later!

Pattern

Materials
Lion Brand Scarfie yarn in Mint Silver - 6 skeins
N/9.00mm hook (Clover Amour is my favorite)
Scissors and Tapestry needle

Notes: 
  • This afghan can be made larger or smaller by adding or reducing the beginning number of chains, just make sure you have an odd number.
  • Chain 2 in the beginning of each row will count as a stitch.
Tips:
  • The spider stitch may be difficult when working into the chain 1 spaces (they are hard to see), to make it easier, just know that the chain two spaces are after every two stitches.
  • The last stitch in the row may become difficult to find. Check out my tip here on getting even rows without having to count your stitches.

Dimensions: 45" x 64"

Abbreviations (US terms)
Ch = chain, sc = single crochet, st = stitch(es)

Pattern:

Row 1: Chain 167, (sc, ch 1, sc) into the 2nd ch from the hook, *skip 1 st, (sc, ch 1, sc) in next st, repeat from * across, sc into last st, turn
Row 2: Ch 2, *(sc, ch 1, sc) into ch 1 space from previous row, repeat from * , sc into last st, turn
Repeat Row 2 until you afghan is 64" long or desired height.


Labels: , , ,

Saturday, February 10, 2018

Free and Easy Crochet Patterns for Spring


Find 26 free and easy spring crochet patterns here!

I think many crochet during only the colder months, but I think crocheting can be enjoyed all year round! I rounded up 26 free and easy patterns that you can enjoy crocheting for spring!

I have found a great variety of crochet patterns so I have grouped them into categories: home decor, Easter baskets/bags, hats, accessories, and tops!

Spring Home Decor Crochet Patterns


Spring Afghan by Maria's Blue Crayon


Garden Party Placemat by Kirsten Holloway Designs


Crochet Lace Eggs by Naztazia


Fallen Arrows Rug by Left in Knots

Spring Amigurumi Crochet Patterns


Sheep Sensory Ball by Sweet Potato Crochet Creations


Easter Chick Shakers by Maria's Blue Crayon

Bonny Bunny Surprise by Trifles and Treasures


Classic Stuffed Bunny by 1 Dog Woof

Easter Basket/Bags


Mini Easter Basket by Nicki's Homemade Crafts


Bunny Head Treat Bag by Sonya Blackstone


Mr. and Mrs. Bunny Bag by Left in Knots


Mini Easter Baskets by Just Be Happy Crochet

Spring Hat Crochet Patterns


Ribbed Bunny Bonet by Left in Knots


Bunny Hat by Make and Do Crew

Spring Crochet Accessories


Spring Fling Triangle Scarf by The Unraveled Mitten


Crochet Bracelet by Wilma Westenberg


Spring Mod Scarf by Left in Knots


Urban Boho Gypsy Bag by Make and Do Crew


Roxy Bag by Maria's Blue Crayon

Spring Crochet Tops/Shawls


Porto Cotton Tunic by Stitch & Hustle


A Little Bit of Bling Shawl by Underground Crafter


Canyonlands Boho Crochet Top by Make and Do Crew


Butterfly Inspired Shawl by Stitch & Hustle


Lacy Ruffles Top by Stitches n Scraps


Ava Shell by Ambassador Crochet


Granny Squared Top by 1 Dog Woof

Labels: ,