Add next in . Do NOT use www. for the new_domain Maria's Blue Crayon: November 2017

Thursday, November 30, 2017

Aspen Infinity Scarf Crochet Pattern

Who doesn't love a nice, basic infinity scarf? This crocheted Aspen Infinity Scarf is made with loads of texture and can be worn with just about anything!

Scroll down for the free pattern and PDF download!


When I discovered the line of Heartland yarns from Lion Brand months ago, I knew I wanted to make a few items with the yarn.  I first made my Heartland Cardigan with a beautiful dark green color that you can see here

I picked up a few more colors of the Heartland yarn, and I knew I wanted to make a scarf with the Grand Canyon color way. It's such a pretty neutral with just the right amount of sheen to it. I think it makes the finished project just so much more classy and elegant.


After doing several swatches of stitches, I was set on a pretty basic stitch. The front post double crochet. For the most part, that's all there is to this scarf! It's a fairly easy stitch once you get the hang of it, and the texture it gives is fantastic!

Overall, I'm pretty stoked with my new scarf. I typically make infinity scarves with bulky weighted yarns, but I'm so glad I decided to design something with a worsted weight yarn.  It took a bit longer than what I was used to when making scarves, but it was well worth it!

Go grab a few skeins of Heartland yarn and let's get started!


Aspen Infinity Scarf Free Pattern

Materials:
2 skeins Heartland yarn (Grand Canyon 101)
J hook
Tapestry needle

Pattern notes:

This scarf is made by crocheting a large rectangle and then sewing the edges together.

At the end of each row, make a front post double crochet into the chain.

Because of the nature of the stitches, the scarf will tend to bunch up and not be as wide as preferred. You can either block the scarf or add more rows for it to be wider.

Abbreviations (US terms):
ch = chain, dc = double crochet, fpdc = front post double crochet

Gauge: 
4" x 4" = 12 st x 7 rows in DC

Pattern:

Row 1: Ch 200, dc into 3rd ch from hook and across, turn
Row 2-9: Ch 2, FPDC in each st across, FPDC in turning chain, turn

Fasten off, leave tail for sewing up sides.

Fold large rectangle in half and sew the short ends together with tapestry needle. Weave in all ends.

Like I said in the pattern notes, you may want to block or add more rows to this scarf. The nature of this stitch is to bunch up, so the scarf may become skinnier than preferred!


Labels: ,

Sunday, November 26, 2017

Snowman Amigurumi Crochet Pattern - Crochet Along Part 2


Welcome to Week 2 of the snowman amigurumi crochet along! I'm happy that after this week, our snowmen will look more like snowmen and not just a white ball!

If you haven't already, I'd love if you would join my Facebook group and share your work. Feel free to ask any questions when you're there! The group is super helpful, encouraging, and kind!

For Week 2/part 2 of this snowman CAL, we will be working on the middle snowball and the head along with attaching the buttons and face.

If you would like to work ahead or would like a printable PDF copy of the pattern, you can purchase it on Ravelry here.

You will find the free pattern for Part 1 and the video tutorial below.

Full Materials List

Worsted weight yarn in white (approx 215 yards) - I used 1 skein Loops&Threads Impeccable
Worsted weight yarn in red, green, orange, brown, and black (small amounts) for snowman accessories, face, and arms
G/4.00 mm hook
H/5.00 mm hook
1 pound poly-fil fiber stuffing
(2) 1" buttons and needle&thread to attach
(2) 12mm safety eyes
1 pipe cleaner cut in half
Tapestry needle
Scissors
Stitch Marker (optional - can substitute by using a piece of yarn)
Pom pom maker (optional)

Gauge 2” x 2” in SC = 9st x 10 rows in SC

Pattern Notes

Snowman will be worked from the bottom up.

Rounds of the snowman will be worked in a continuous round.

Use stitch marker/piece of yarn to mark what round you are on.

Snowman will be stuffed as you work. (Pattern will tell you when to stuff.) Stuff as much as you can as the poly-fil will tend to settle.

Invisible sc decrease: work a regular sc decrease except work them in the front loops only, this will create a cleaner look.

Abbreviations
MR = Magic ring, Ch = chain, SC = single crochet, DC = double crochet, st = stitch(es), invisible sc dec = invisible single crochet decrease, FPDC = front post double crochet, BPDC = back post double crochet

Pattern continued from Part 1 (you can find that here)

Round 35. 2sc in each stitch around (64)
Round 36-48: sc in each stitch around (64)
Round 49: *sc in next 6 st, invisible sc dec, repeat from * around (56)
Round 50: *sc in next 5 st, invisible sc dec, repeat from * around (48)
Round 51: *sc in next 4 st, invisible sc dec, repeat from * around (40)

Do not fasten off - Sew on buttons and add poly-fil.

Round 52: *sc in next 3 st, invisible sc dec, repeat from * aound (32)
Round 53: *sc in next 2 st, invisible sc dec, repeat from * around (24)
Round 54: 2sc in each st around (48)
Round 55-64: sc in each st around (48)
Round 65: *sc in next 4 st, invisible sc dec, repeat from * around (40)
Round 66: *sc in next 3 st, invisible sc dec, repeat from * around (32)

Attach safety eyes and sew on mouth with black yarn and sew on nose. Add poly-fil.
Nose: Using orange yarn and G/4.00mm hook - Ch 4, sc in 2nd chain from hook and across. Turn. Ch 1, sc triple decrease. Fasten off and leave tail for sewing.

Round 67-68: sc in each st around (32)
Round 69: *sc in next 2 st , sc invisible dec, repeat from * around (24)

Add poly-fil.

Round 70: *sc, sc invisible dec, repeat from * around (18)
Round 71: sc invisible dec around (9)

Add additional stuffing as needed before you close up the hole. Use the end of your crochet hook to get as much stuffing in as you can. Sew up the hole and weave in ends.

Stay tuned for Part 3! That will come out December 3rd (12pm EST). Stay updated by subscribing to my mailing list and/or YouTube channel (if you prefer the videos!)


Labels: , , ,

Wednesday, November 22, 2017

Comfy Cozy Oversized Crochet Cardigan Pattern - Poppy Cardigan

Scroll for free version below.


If you're looking for something cozy to snuggle up in all Winter long, this is the cardigan for you.  It's made with basic stitches and is easily constructed. I added photos along with the instructions to help you along the way!


I made this cardigan so it was loose fitting for extra coziness and the stitches I paired together make the ultimate squishy texture. It's amazing... just trust me.


But who am I to judge? Whip up this cardigan and tell me what you think! I'm pretty confident that you will love it.

I made this cardigan with Loops&Threads Poppy yarn that I found on clearance at Michael's. Awesome because I spent about $12, but also a bummer because it's a discontinued item. 


If you have Poppy yarn on hand, I suggest you use it because it's made with Nylon and makes it so much more stretchy and cozy. However, it is hand-wash only - so that could be a factor you don't want to deal with.

In the pattern notes, I have other yarns that were used when testing this cardigan and other yarns I suggest to use for this pattern.


Materials
Loops&Threads Poppy yarn or yarns suggested in pattern notes (S/M ~ 1500 yds, L/XL ~ 2100yards)
J/6.00mm hook
Tapestry needle & Scissors

Gauge 4”x4” ~ 12st x 8 rows of alternating treble crochet and half double crochet 

Abbreviations (US terms)
Ch = chain, hdc = half-double crochet, tr = treble, sc = single crochet, st = stitch(es), sk = skip

Pattern notes

The body/main piece of the garment will be made in one piece from side to side. Sleeves are made separately.

Once the main piece is done, sides will be folded in and seamed on the top and sleeves will be seamed onto holes on main portion.

Beginning chains will count as a stitch throughout the pattern. Because of this, do not make next stitch into same space unless otherwise stated.


Last two stitches may be hard to see, use a stitch marker to mark off beginning stitches to help ‘see’ the last stitches. The photo above shows the last two stitches - the very last stitch being the beginning chain from previous row.
The garment will tend to stretch and become longer through wear as there are no seams on the sides to ‘hold’ it up. To make the garment shorter/longer decrease/increase the beginning chain by multiples of 2.

Sizing
Small/Medium and Large/XLarge measures 34" in height, 2X/3X measures 36" in height
Small/Medium measures 22” across the back
Large/Xlarge measures 28” across the back
2X/3X meausres 34” across the back

When reading the pattern, if there is one number - it will apply to both sizes. If there are 2 numbers, the number in parenthesis will be for the Large/Xlarge, 2X/3X size. As for stitch counts, the Small/Medium will be for the first number and the Large/Xlarge the second number and 2X/3X will be the last number.

Yarn suggestions: I have had testers use Lion Brand Mandala and Loops and Threads Snuggly Wuggly yarn with great results. I suggest any DK/Weight 3 yarn.


Pattern

First panel - Small/Medium (Large/Xlarge, 2X/3X)
Row 1: Ch 96 (96, 102) HDC in 3rd ch from hook and across, turn (95, 95, 101)
Row 2: Ch 2 (counts as st), hdc across, turn (95, 95, 101)
Row 3: Ch 4 (counts as st), *hdc, tr, repeat from * across, turn (95, 95, 101)
Row 4: Ch 2 (counts as st), *tr, hdc, repeat from * across, turn (95, 95, 101)
For Small/Medium Repeat Row 3&4 until you have 18 rows
For Large/Xlarge Repeat Row 3&4 until you have 24 rows
For 2X/3X Repeat Row until you have 30 rows

Main body - Small/Medium (Large/Xlarge, 2X/3X)

Continuing from the first panel:
Repeat Row 3 until you have 24(30, 36) st left in the row, ch 27(33, 39)


Hdc in 5th ch from hook, *tr, hdc, repeat across (you will have 24(30, 36) st before you get back to the main portion of the garment)

Repeat Row 3 until you have 43(55, 67) rows for the main body

Second panel - Small/Medium (Large/Xlarge)

Continuing from the main body:
Repeat Row 3 until you have 24(30, 36) st left in the row, ch 27(33, 39)
Hdc in 5th ch hook hook, *tr, hdc, repeat across (you will have 24(30, 36) st before you get back to the main portion of the garment)
Repeat Row 3 until you have 16(22, 28) rows for the second panel
Ch 2 (counts as st), hdc across, turn
Fasten off

This is what the body portion will look like when complete. 

Sleeves (made separately): Small/Medium (Large/Xlarge)
Row 1: Ch 50(62, 70), hdc 4th ch from hook, *tr, hdc, repeat from * across (48, 60, 68)
Row 2: Ch 3 (counts as st), *hdc, tr, repeat from * across, sk last st, turn (47, 59, 67)
Row 3: Ch 3 (counts as st), tr, *hdc, tr, repeat from * across, sk last st, turn (46, 58, 66)
Row 4: Ch 2, (counts as st), *tr, hdc, repeat from * across, sk last st, turn (45, 57, 65)
Row 5: Ch 3, (counts as st), hdc, *tr, hdc, repeat from * across, sk last st, turn (44, 56, 64)
Row 6-13: Repeat Rows 2-5 (each row will be one st less than the last)
Row 14: Ch 3 (counts as st), hdc, *tr, hdc, repeat from * across (36, 48, 52)
Row 15-26: Repeat Row 14 (36, 48, 52)
Row 27-34: Repeat Rows 2-5 (each row will be one st less than the last)
Row 35: Ch 2, hdc across, turn (28, 40, 44)
Row 36-37: Repeat Row 35
You can either fasten off and leave a tail to sew up the side to form into a sleeve or you can ch 1 and sc up the side with your hook


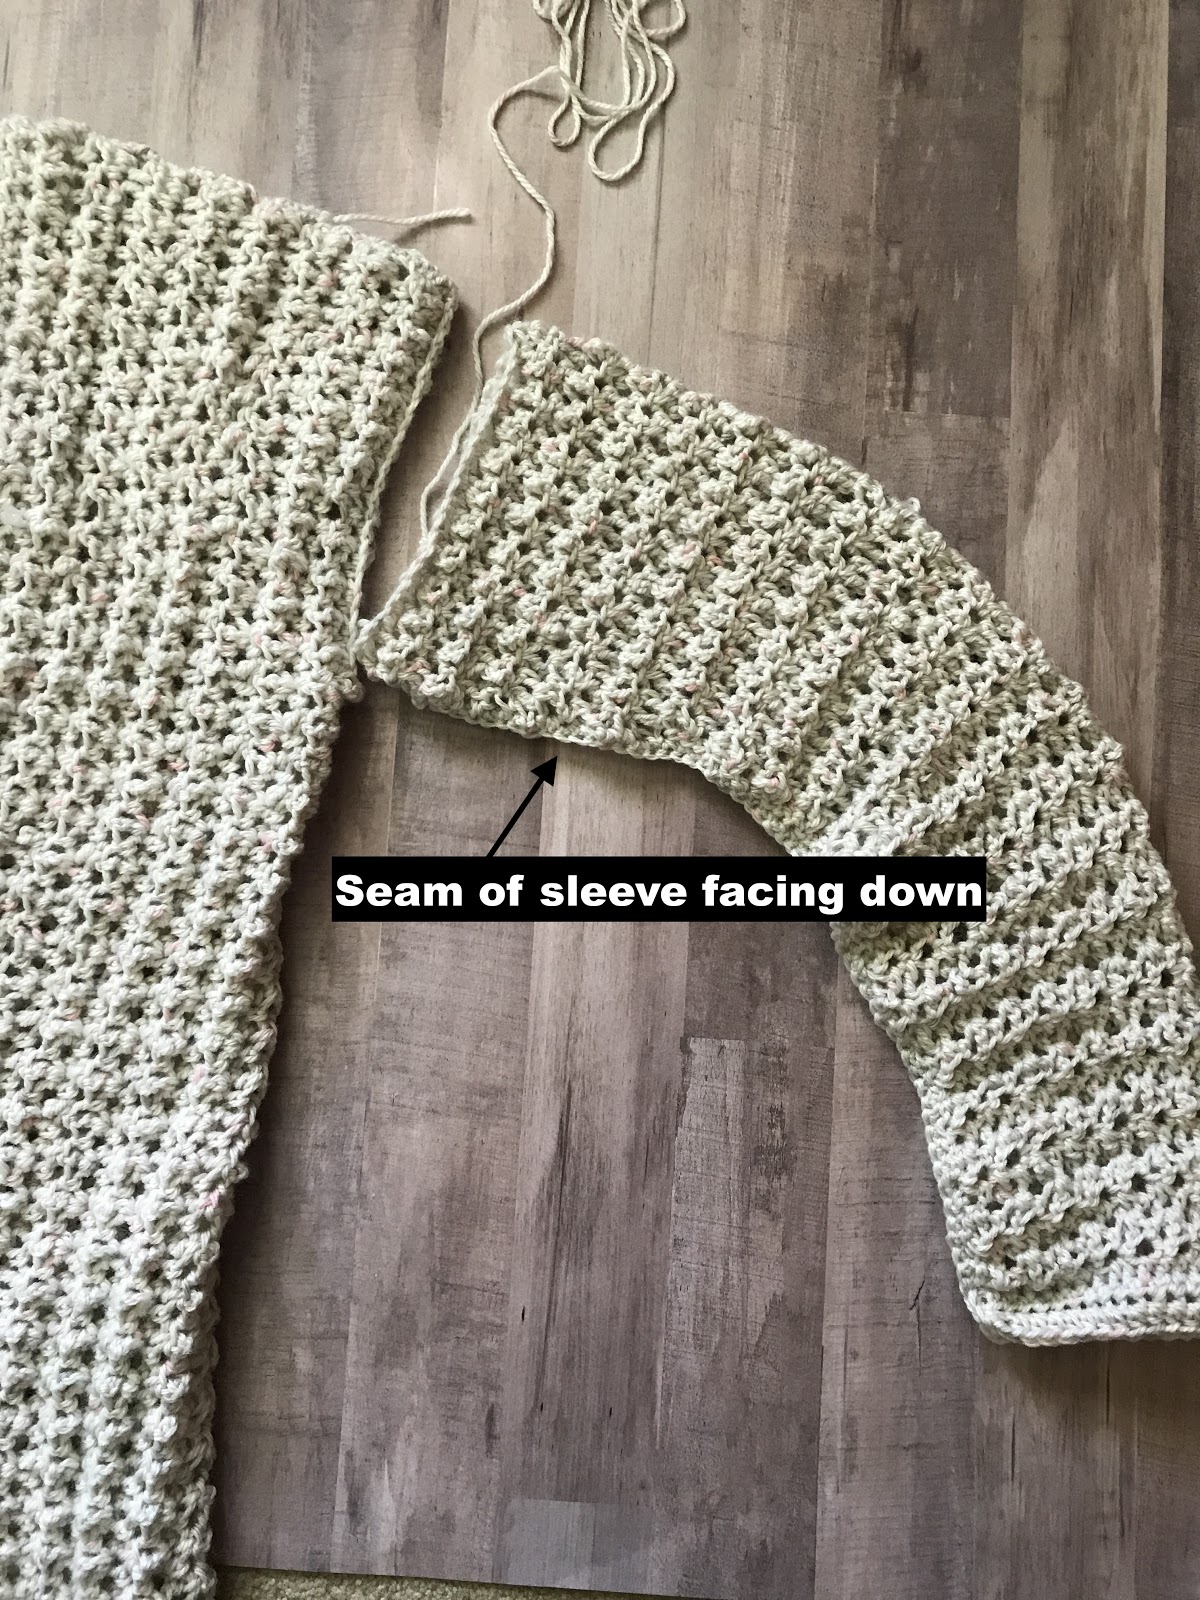
Fold sleeve in half as shown in picture and seam up the side.
Make 2 sleeves

Once all pieces are finished fold in the sides of the main piece and seam up the top using a whip stitch, this will form holes on the sides for the sleeves.


Sew on sleeves using a whip stitch making sure the seam of the sleeve is faced down/attached to the armpit portion of the arm hole.

Once all pieces are sewn up, flip inside out. This will now be the ‘right side’ of the cardigan with all the seams on the inside.


Edging: Attach yarn to bottom of cardigan, Ch 2, hdc up the side, around the neckline and down the other side of the cardigan, turn
Ch 2, hdc up the side, around the neckline and down the other side, fasten off

Weave in any and all ends. Now you can cozy up!


Labels: ,

Tuesday, November 21, 2017

Crochet Tip: How to Check Your Gauge and Why it's Important


Have you ever wondered why your crochet project isn't measuring up to the dimensions it should be? Have you ever made a slipper, top, or hat and the final product came out way too big or way too small?

If this has happened to you, you need to check your gauge!

What is gauge?

So I'm telling you that it's important to check your gauge, but you may be asking - what the heck is gauge? 

To give it to your straight - it's basically a measurement of your stitches. 

In a pattern, gauge is typically written something like this:

4" x 4" = 12 stitches x 8 rows in DC

That means when measuring a 4 inch by 4 inch square of your work/stitches in double crochets, there are 12 stitches across and 8 rows up and down.

*Typically it's 4"x4", but not always. 

How to Check Gauge

In order to check your gauge, you will have to make a 'gauge swatch'. It's another step in making your item, but it may be totally worth it if you're making something like a hat or top where measurements are crucial. 

Start with the recommended hook size and yarn weight in the pattern you are following and start chaining until you have about 6" (or two inches larger than what the gauge lists).  The gauge in the pattern should tell you what stitch. Make about 6" (or two inches more of what the gauge lists) worth of rows.


Now you have a small square to measure/check your gauge. You will need a ruler or measuring tape for this part. 

Simply, lay down your ruler/measuring tape and count the stitches across over a span of 4" (or the length of the gauge in the pattern). Do the same vertically for the rows. You will now have your gauge.


*You may want to measure from 2" - 5" as the first inch may not always be accurate on a measuring tape.

Looking at the photos above, the gauge would be 13 stitches x 7 rows in double crochet.

Next, you will compare that to the gauge in the pattern. If they match, you're all set!

If the number of stitches/rows are less than the gauge in the pattern, that means you have a tighter tension than the designer of the pattern and you will need to go up a hook size (or two, or three) in order to obtain the same gauge. Make another swatch with the next hook size up and check gauge again. Depending on your gauge, you may need to do this multiple times until your gauge matches.

If the number of stitches/rows are more than the gauge in the pattern, the means you have a looser tension than the designer of the pattern and you will need to go down a hook size (or two, or three) in order to obtain the same gauge. Make another swatch with the next hook size down and check gauge again. Depending on your gauge, you may need to do this multiple times until your gauge matches.

*Tips - Jot down the yarn weight, hook, and your gauge so you can use it for future reference for other patterns.

Also, if you find that you have the same gauge as a designer, take note of that as you most likely can get away with following that same designer's other patterns without checking your gauge.

It would also be a good idea to take note that a certain designer has a looser/tighter tension so you know that you will most likely have to go up/down a hook size when following that particular designer's patterns.

Why it's Important to Check Your Gauge

Confession: For the longest time, I never checked my gauge. Should I have? Yes, probably. I made tons of hats using patterns and sold them without checking my gauge.  I never had any complaints, but I was actually commended on the hats having some room for the kids so they could wear it another year.

Basically, I was making my hats a bit larger than they should have been. Win win for the kids and the parents getting more bang for their buck, but not a win if you're an adult and you'd like your hat to fit perfectly and not loosey goosey.

So that is the #1 reason you need to check your gauge. You may be making items too large or too small. It dwindles down to your tension - if you crochet loose (like me) your items may end up larger and if you crochet tightly, your items may end up smaller.

With that being said, it all depends on the pattern and who designed the pattern. If the designer of the pattern has a similar tension to yours, no worries. Likewise, if the designer has a very different tension than yours, your item most likely will not come out being the same dimensions. Make sense?

It's super important to check your gauge when making a garment/top because measurements determine if the garment will fit you correctly or not.

Something like a blanket or scarf may not be detrimental to check your gauge, but it wouldn't hurt if you'd like the exact dimensions that pattern designer obtained.


Now that you know how to check your gauge, don't be afraid to take the extra step to do so! It may save you lots of frogging in the future.

Labels: , ,

Sunday, November 19, 2017

Snowman Amigurumi Crochet Pattern - Crochet Along Part 1


Welcome to the very first week of the snowman amigurumi crochet along! I'm so excited to start this project with you!

If you haven't already, I'd love if you would join my Facebook group and share your work. Feel free to ask any questions when you're there! The group is super helpful, encouraging, and kind!

For Week 1/Part 1 of this snowman CAL, we will be working on the lower portion of the snowman's body.  We will be working the first 34 rows.

If you would like to work ahead or would like a printable PDF copy of the pattern, you can purchase it on Ravelry here.

You will find the free pattern for Part 1 and the video tutorial below.

Full Materials List

Worsted weight yarn in white (approx 215 yards) - I used 1 skein Loops&Threads Impeccable
Worsted weight yarn in red, green, orange, brown, and black (small amounts) for snowman accessories, face, and arms
G/4.00 mm hook
H/5.00 mm hook
1 pound poly-fil fiber stuffing
(2) 1" buttons and needle&thread to attach
(2) 12mm safety eyes
1 pipe cleaner cut in half
Tapestry needle
Scissors
Stitch Marker (optional - can substitute by using a piece of yarn)
Pom pom maker (optional)

Gauge 2” x 2” in SC = 9 st x 10 rows in SC

Pattern Notes

Snowman will be worked from the bottom up.

Rounds of the snowman will be worked in a continuous round.

Use stitch marker/piece of yarn to mark what round you are on.

Snowman will be stuffed as you work. (Pattern will tell you when to stuff.) Stuff as much as you can as the poly-fil will tend to settle.

Invisible sc decrease: work a regular sc decrease except work them in the front loops only, this will create a cleaner look.

Abbreviations
MR = Magic ring, Ch = chain, SC = single crochet, DC = double crochet, st = stitch(es), invisible sc dec = invisible single crochet decrease, FPDC = front post double crochet, BPDC = back post double crochet

Pattern

Using White Yarn and G/4.00mm hook

Round 1: MR, 8sc into ring (8)
Round 2: 2sc in each stitch around (16)
Round 3: *2sc, sc, repeat from * around (24)
Round 4: *2sc, sc in next 2 st, repeat from * around (32)
Round 5: *2sc, sc in next 3 st, repeat from * around (40)
Round 6: *2sc, sc in next 4 st, repeat from * around (48)
Round 7: *2sc, sc in next 5 st, repeat from * around (56)
Round 8: *2sc, sc in next 6 st, repeat from * around (64)
Round 9: *2sc, sc in next 7 st, repeat from * around (72)
Round 10: *2sc, sc in next 8 st, repeat from * around (80)
Round 11-28: sc in each stitch around (80)
Round 29: *sc in next 8 st, invisible sc dec, repeat from * around (72)
Round 30: *sc in next 7 st, invisible sc dec, repeat from * around (64)
Round 31: *sc in next 6 st, invisible sc dec, repeat from * around (56)
Round 32: *sc in next 5 st, invisible sc dec, repeat from * around (48)
Round 33: *sc in next 4 st, invisible sc dec, repeat from * around (40)
Round 34: *sc in next 3 st, invisible sc dec, repeat from * around (32)

Do not fasten off - stuff with poly-fil. Make sure the bottom is relatively flat so it can stand up on its own.

Video tutorial: https://youtu.be/3PLuS_dRcSQ

Stay tuned for Part 2! That will come out November 26th (12pm EST). Stay updated by subscribing to my mailing list and/or YouTube channel (if you prefer the videos!)

**Update: Part 2 is now available.

Labels: , , ,

Wednesday, November 15, 2017

16 Crochet Patterns Using Caron Cakes

If you've been following my blog, you know that I have a handful of patterns using Caron cakes. When the Caron cakes first came out sometime last year, I grabbed a few but had no idea what to make with them.  With the cakes being a new, I barely found any patterns using them either.

I left them on the shelf until late summer/early Fall of this year. They came out with a new line of cakes: Tea Cakes, Sprinkle Cakes, Cupcakes, Big Cakes plus a handful of new colors for the regular Caron cakes. So many options!

It's safe to say that I was hooked once those new cakes came out! My favorite are the Tea Cakes which are a super bulky weight and the Big Cakes are my next favorite as they are 100% acrylic, super soft, and has so much yarn in just one skein!

If you haven't picked up a few cakes yet, I 100% recommend it. Grab some cakes and browse the 16 patterns below to start your next project!


Labels: ,

Monday, November 13, 2017

Snowman Amigurumi Free Crochet Along

If you are looking for a fun holiday crochet along that includes both a written pattern and video tutorial, you've come to the right place!


This snowman amigurumi will be made over a span of 3 weeks starting November 19th. You will have this snowman done by the first week of December - just in time for the holiday and Winter season!

Measuring 14" from the tip of his pom pom to the bottom, this snowman makes a great holiday decoration for the home! It is made with basic stitches and a great project for beginners and seasoned crocheters alike!

Sign up for my email list to stay posted on when each week is released. I also send an email every time I have a new, free pattern on my blog! Click here to sign up.

Grab your materials and get your hooks ready! Join the facebook group, Maria's Blue Crayon Yarn Friends, to crochet along with fellow yarnies and to share your progress!


When the CAL starts, I will also have a PDF printable available for those who would like all instructions in one file to print/download without ads.

Materials:
Worsted weight yarn in white (approx 215 yards) - I used 1 skein Loops&Threads Impeccable
Worsted weight yarn in red, green, orange, brown, and black (small amounts) for snowman accessories, face, and arms
G/4.00 mm hook
H/5.00 mm hook
1 pound poly-fil fiber stuffing
(2) 1" buttons and needle&thread to attach
(2) 12mm safety eyes
1 pipe cleaner cut in half
Tapestry needle
Scissors
Stitch maker (can substitute with piece of yarn)
~2" Pom pom maker (optional)

Gather up your materials and mark your calendars! The crochet along starts Sunday, November 19th!

Part 1 - Available Now
Part 2 - Available Now
Part 3 - Available Now

If you don't want to wait or would like an ad-free PDF printable - click here to purchase on Ravelry!


Labels: , ,

Friday, November 10, 2017

Gingerbread Boy and Girl Ragdoll Style Amigurumi - Free Crochet Pattern

These crochet amigurumi gingerbread boy and girl are the perfect little holiday project.  This free crochet pattern comes with a video tutorial to help you make your own gingerbread stuffy. Make one for your favorite little in your life or use it as a cute addition to your home decor.

Scroll down for the free pattern and the video tutorial.


If you participated in my Christmas Granny Square Afghan CAL, these gingerbread may look familiar! They are made with the same basic construction as the gingerbread applique for the afghan, except they are larger and 3D!

Unlike traditional amigurumi, these gingerbread are made by crocheting in rows rather than rounds. Two 2D shapes are made and sewed together with a bit of stuffing inside to make it 3D!


This pattern only calls for chains and single crochets, so if you know how to do those two stitches, you're all set! 

Get creative as you'd like! As you can see, I made a girl and a boy by just moving the bow and using different colors for the bow and buttons.

I used Bernat Blanket for a soft and cuddly feel but you can easily double up a worsted weight yarn or use a different bulky weight yarn to achieve the same gingerbread boy or girl.

PURCHASE THE AD-FREE PDF DOWNLOAD/PRINTABLE HERE.
Thank you so much for your support!

PIN IT TO YOUR CROCHET BOARDS ON PINTEREST.
Sharing in any way you can really helps my blog going and the free patterns coming - thank you!


Free Gingerbread Amigurumi Crochet Pattern

Materials:
Bernat Blanket in Taupe and White
Worsted weight yarn
J/6.00mm hook
H/5.00mm hook
(2) 1 inch buttons with thread and needle to attach
(2) 12mm safety eyes
Poly-fil stuffing
Tapestry needle and scissors

Abbreviations: US terms
Sc = single crochet, ch = chain, st = stitch(es), sl st = slip stitch

Dimensions:
Measures 12” from head to toe and 9” across the arms
Notes:

Ch 1 in beginning of rows do not count as st

The gingerbread will be made by making (2) 2D shapes then crocheting the edges together with a bit of stuffing inside.

Pattern

Arms&Body
Taupe colored yarn and J/6.00mm hook

Row 1: Ch 23, sc in 2nd ch from hook and across, turn (22)
Row 2-4: Ch 1, sc across, turn (22)
Row 5: Ch 1, sl st in next 8 st, ch 1, sc in same st as last sl st and in next 7 st, turn
Row 6: Ch 1, sc across, turn (8)
Row 7: Ch 1, 2sc, sc in next 6 st, 2sc, turn (10)
Row 8: Ch 1, sc across, turn (10)
Row 9: Ch 1, 2sc, sc in next 8 st, 2sc, turn (12)
Row 10-12: Ch 1, sc across, turn (12)

Legs

Continuing from body

Row 1: Ch 1, sc in same stitch and next 5 st, turn
Row 2-6: Ch 1, sc across, turn (6)
Row 7: Ch 1, sc decrease 3 times
Fasten off

Attach yarn to the st right next to the first leg
Repeat instructions for first leg

Head

With the legs facing down and the arms up top, attach taupe colored yarn 8 st in from the right arm

Row 1: Ch 1, sc in same st where yarn was attached and in next 5 st, turn (6)
Row 2: Ch 1, 2sc in each stitch across, turn (12)
Row 3-5: Ch 1, sc across, turn (12)
Row 6: Ch 1, sc decrease, sc in next 8 st, sc decrease, turn (10)
Row 7: Ch 1, sc decrease, sc in next 6 st, sc decrease, turn (8)
Row 8: Ch 1, sc decrease, sc in next 4 st, sc decrease (6)
Fasten off

Make 2 gingerbread shapes, we will crochet them together in the end.

Embellish one side of the gingerbread with eyes, mouth, buttons, and bow.

Bow
Use worsted weight yarn and H/5.00mm hook

Row 1: Ch 7, sc in 2nd ch from hook and across (6)
Row 2-28: Ch 1, sc across, turn (6)
Fasten off leaving about 5 ft of yarn for a tail
Sew Row 1 to Row 28 with a tapestry needle. Making sure the seam is centered, cinch the bow and wrap yarn around the center until you have about 6 in of yarn left. Secure bow by tying a knot with the yarn on the back.
Sew bow onto gingerbread.

Construction

To assemble the gingerbread, hold both pieces together lining up the stitches.
Using the Bernat Blanket yarn in white, attach yarn through both pieces, ch 1 and sc around the gingerbread going through both pieces. About ¾ around, stop and stuff the inside with polyfil. Continue to sc around and stuff as you go. Sc to the first sc and fasten off. Weave in ends.

I'd love to see your creations! Tag me over on instagram @mariasbluecrayon or join my yarn friends group on Facebook to share!


Labels: , , ,