Add next in . Do NOT use www. for the new_domain Maria's Blue Crayon

Sunday, January 6, 2019

Crochet Triangle Scarf - Free Crochet Pattern

SCROLL DOWN FOR THE FREE CROCHET TRIANGLE SCARF PATTERN.

I've been sitting on this pattern for a while and I'm so happy to finally share it with you!

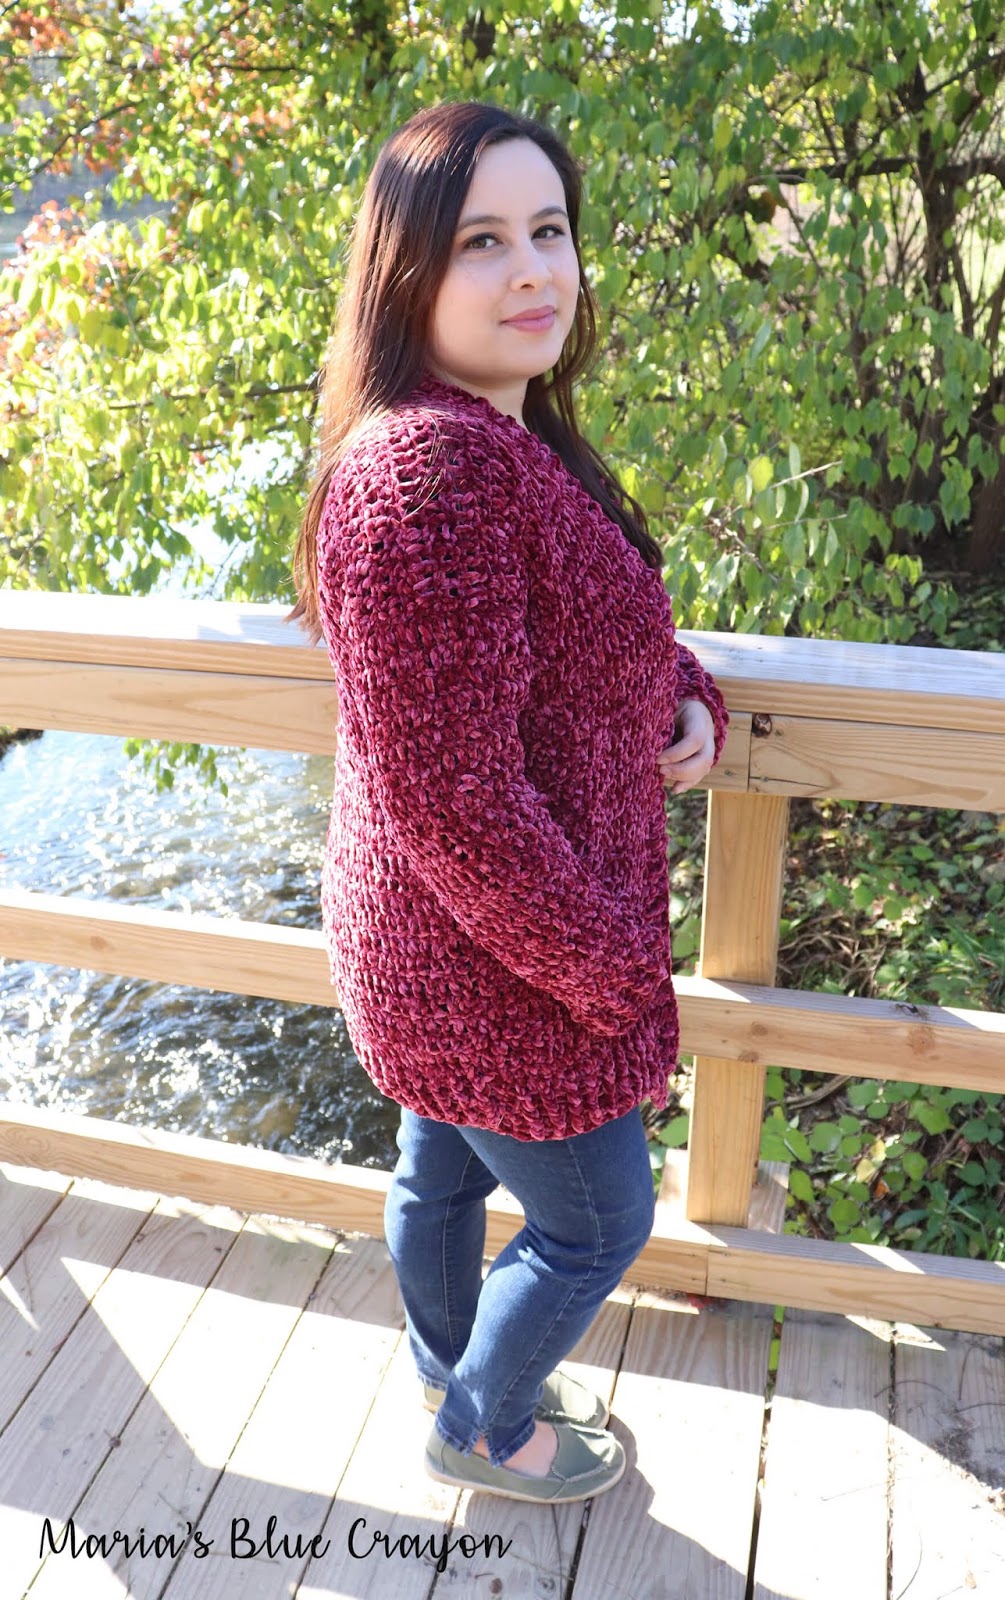
This triangle scarf (or shawl) was made for my mother in law this past holiday season. Since I gifted it, I made myself one because I loved it so much and so I could write up the pattern for it!


Initially, I wanted to crochet myself a triangle scarf with a different type of yarn. I was looking for an ombre or self striping yarn, but in the end I loved all the neutrals together so much so I stuck with those!

For this triangle scarf, I used a weight 3/DK yarn. I don't typically use weight 3 yarns because they don't come by often in the big box stores in the states. I found some yarn at Michael's and it looked promising, so I gave it a try!


I used Joy DK from Michael's and I really love it! It's soft, has a slight shine to it, doesn't split, and is nice to work with. Another plus is, it comes in beautiful colors! There are also some variegated colors as well.


For the stripes, I did not follow any sort of pattern. I just started to crochet with one color and switched out colors when it felt right to me. Below, I write out how many rows of each color and the order I crocheted them in. However, you can follow any kind of stripe pattern you'd like!

Crocheting this triangle scarf was pretty mindless once I got into it.  It's an easy two row repeat and although I have how many rows I crocheted, you can very well keep going and make it as large as you'd like!


Free Crochet Triangle Scarf Pattern


Materials

Loops and Threads Joy DK (1 skein in each of the following colors: Cloud, Latte, Snow)
J/6.00mm hook
Tapestry needle/Scissors
Stitch markers (optional)

Pattern notes

Yarn used is categorized as weight 3/DK. You may substitute yarns as long as you follow gauge below.

Beginning chain 3 of each row will count as a stitch. Use stitch markers at the beginning of each row (on top of chain 3) to help identify that first stitch easily.

*Modified puff stitch (will be written as “puff st” in pattern): Insert hook in st, YO, pull up a loop 3 times all in same stitch, YO pull through all loops on hook

Each row will increase by 6 stitches not counting ch 2 spaces in the middle.

The following is the number or rows for each color I used to get the random striping:
11 rows Latte
7 rows Snow
5 rows Cloud
2 rows Snow
2 rows Latte
3 rows Snow
2 rows Latte
2 rows Cloud
2 rows Latte
1 row Snow
3 rows Cloud
1 row Latte

Dimensions: ~ 58” x 31”

Gauge: 4” x 4” ~ 13 st x 7 rows

Abbreviations (US terms):
Ch = chain, dc = double crochet, st = stitch(es), sk = skip, sp =space

Pattern

Row 1: Magic ring, Ch 3 (counts as st), 3dc, ch 2, 4dc all in magic ring. Tighten ring, turn your work

Row 2: Ch 3 (counts as st), puff in same sp as ch 3 (see notes for how to make modified puff st), ch 1, sk 1, puff in next st, ch 1, sk 1, (2dc, ch 2, 2dc) in ch 2 sp from previous row, puff in next st, ch 1, sk 1, puff in next st, ch 1, dc in last st, turn

Row 3: Ch 3 (counts as st), dc in same sp as ch 3, dc in each st across until you reach ch 2 sp from previous row, (2dc, ch 2, 2dc) in ch 2 sp, dc in each remaining st, 2dc in last st, turn 
Note: You will have 10 double crochets on each side of the ch 2 space after completing Row 3. It may be easy to accidentally skip over the last stitch. Use stitch markers to mark the beginning chain 3 as necessary. Each side of the triangle will grow by 3 stitches after each row.

Row 4: Ch 3 (counts as st), puff in same st as ch 3, ch 1, sk 1, *puff in next st, ch 1, sk 1, repeat from * until ch 2 sp, (2dc, ch 2, 2dc) in ch 2 sp, *puff in next st, ch 1, sk 1, repeat from * until end of row, dc in last st, turn

Repeat Rows 3 and 4, changing colors as desired or by following the color sequence/number of rows in the pattern notes until you have a total of 41 rows or until your scarf/shawl is as large as you’d like it to be.


Labels: , ,

Wednesday, December 12, 2018

Crochet Dog Sweater - Free Step by Step Tutorial

Keep scrolling for the Free Crochet Dog Sweater Tutorial


I never thought I would be making my dogs crochet sweaters, but here I am! My two dogs are cockapoos and once full grown are between a small/medium sized breed.

Milo is 10 months and for the most part fully grown. I have a hard time even finding a harness for him because he is between sizes in most doggy wear.


I knew I wanted to make him a crochet dog sweater but I figured I would make one custom fit for him. I have found dog sweaters in stores but again, he is usually between sizes and I didn't want one too small or too big for him.

This crochet dog sweater tutorial that I have typed up is just a basic crochet dog sweater. You can embellish it or spruce it up however you'd like.


This dog sweater is made by first crocheting the collar. The collar is ribbed and worked in rows before joining to create the collar of the sweater. Then it is working in rounds to fit the chest and legs then finish up in rows to make the back portion of the sweater.

I will show you step by step how to measure your dog and what stitches to use in order to get the perfect fit for your dog. There is only a couple of easy measurements to ensure the sweater will fit your dog correctly and you can try it on your dog after each step to ensure you are on the right track.


This isn't an exact pattern, more of an explanation of how to make the dog sweater and I give examples where I can to help make sense of things. Don't hesitate to ask questions if you have any!

I hope you find this tutorial helpful in making your puppers a crochet sweater! I would absolutely love if you shared with me your finished dog sweaters on your precious pup! Tag me on instagram @mariasbluecrayon or you can share with me in my facebook group Maria's Yarn Friends.


Happy Crocheting!


PIN IT TO YOUR PINTEREST CROCHET BOARD FOR LATER.

Crochet Dog Sweater Tutorial

Materials:
Worsted weight yarn
I/5.5mm hook
Stitch Markers
Tape Measure
Scissors & Tapestry needle to finish off yarn ends
Dog that you are making the sweater for

Notes:

Knowledge of basic stitches, working in the round and rows, and increasing is necessary to complete this project.

The beginning chains will not count as a stitch.

This tutorial is a lot of explanation and guiding you in order to crochet a sweater for your dog.  I will include examples where applicable.

Since this tutorial is step by step and made to fit your pet, you can theoretically use any yarn you'd like along with the appropriate hook size.

This dog sweater is a pullover sweater, so your dog should be comfortable with things going over their head and then putting their paws through the sweater.

Gauge is not important in this tutorial because you will be fitting and measuring as you go. However, if you are a tight crocheter, you will want to make sure your stitches are loose enough for so fabric is stretchy and not tight.

Step 1: Making the collar for the sweater

The collar is made in short rows then joined so it can be worn around the neck.

To figure out how long you need to start your chain, measure your dogs neck from behind their ear to where their neck meets their body. This will be the height of the collar. 

(You can make the collar shorter if you'd like, I simply folded the collar down for my dogs but also have the option to fold it up like a turtle neck).

Once your chain is long enough, single crochet into the 2nd chain from hook and across, turn.
Chain 1, single crochet in back loop only all the way across, turn.


Repeat the last row until it fits around your dogs neck or is the size of their collar. I added a few extra rows (about an inch) so it will be comfortable around my dog's neck.


Join the last row to the first row to form a loop to complete the collar. Join by single crocheting or slip stitching the two rows together. Turn your work 90 degrees and single crochet along the side of the collar (one single crochet for each row). Join to the first single crochet. DO NOT FASTEN OFF.

Slip the collar over your dogs head to make sure it fits comfortably.

Step 2: Measure your dog's chest and start the body of the dog sweater

We will begin to work in rounds using half double crochets to make the body of the sweater.

For this step, you will need to measure your dog's chest. Using a tape measure, wrap it around their chest under their armpits and around their back. Measure loosely, you probably won't want the sweater to be too tight fitting.

Since my dogs are really fluffy, I took into account that their floof would need some room to breath.


We will start to increase the following rounds until the sweater matches the measurement of your dog's chest measurement.
Example: Milo's chest measurement was 21" so I made increases in the next rounds until the sweater measured 21" around.

I didn't want to increase too abruptly so I increased after every 3 half double crochets.

For Milo, I only had to do two rows of increases (increasing only after every 3 half double crochets) until I got his chest measurement (or close to it).

For Penny, after increasing just one round (increasing only after every 3 half double crochets), I only needed one more inch for the sweater to be the same measurement as her chest measurement. Doing another row of increases every 3 half double crochets would have been way too much. 

I did a little easy math to figure out just how much I needed to increase for the next row so I didn't go overboard and make the sweater too large for her.

I laid down my tape measurer to my work and measured how many stitches across equaled one inch. That turned out to be 4 stitches.

I knew I needed only 4 more stitches to make the sweater one inch larger. So in the next round, I only made a total of 4 increases in the round - spacing them out as equally as possible.

Once your sweater matches the chest measurement of your dog, try it on your dog to see approximately how much more length you need until it reaches your dog's legs.

Continue to work half double crochets in the round (just one in each) and trying it on your dog every so often until you see that it reaches your dog's legs.

Step 3: Making leg holes for the dog sweater


Once the sweater reaches the legs, you will want to make the leg holes. (The sweater looks short on my dog, but Penny has a lot of fluff so her legs do start there underneath all that fur.)

To make leg holes, you will want to put the sweater on your dog and put stitch markers on the inside and outside of each leg. 

OR you can measure the space between your dogs legs in the front and the width of your dogs leg.

If you used stitch markers, you will simply continue onto the next row and half double crochet until you get to a stitch marker that marks where their leg begins. Count the number of stitches until the next stitch marker and chain that number of stitches and skip all those stitches to leave space for their leg. Half double crochet into the stitch immediately after and keep half double crocheting and do the same for the next leg hole.


If you used a measuring tape, you will continue onto the next row and half double crochet until it measures the space between your dogs front legs (Penny's was a bit over 3"). Then you will work on the first leg hole.

Chain until it equals their leg width measurement. (Penny's was ~2") Skip the same amount of stitches and then half double crochet into the stitch after to create the leg opening.

Continue to half double crochet around until you have the amount of stitches left you need for the second leg hole. Chain the amount of stitches left and join to the first half double crochet.

Try the sweater on your dog and make sure it fits them well through the chest and their leg holes are big enough to get their paws in and out.

Step 4: Finishing the body of the dog sweater

All the "difficult" parts are over and now we just need to add length to the sweater.

Continue to half double crochet around (one in each stitch) until the sweater reaches somewhere around your dog's rib cage.

I made Milo's (male) stop at about the middle of his ribcage to give him plenty of room to use the bathroom without soiling the sweater.

I was able to make Penny's (female) a bit longer without worrying about her getting her sweater soiled.

Fasten off and weave in ends.

We will now work on lengthening the back of the sweater.

Attach yarn to where it lines up to the outside of the left leg hole and half double crochet until you reach where the outside of the second left hole lines up. Turn your work.

Continue to work in rows until the back of the sweater is long enough to cover your dog's back.

To add a bit of ribbing detail at the very end of the sweater, alternate front post and back post double crochets for 2-3 rows.


I hope this tutorial is helpful! This is my first time going through steps and explaining how to make a crochet item versus a concrete pattern so I hope it wasn't too confusing. Please feel free to ask any questions!


Labels: , ,

Sunday, November 18, 2018

Crochet Velvet Cardigan Sweater - Free Pattern

Scroll down for the Free Crochet Pattern for the Velvet Cardigan Sweater.


The Crochet Velvet Cardigan has been a huge work in progress for the past month! My wonderful pattern testers did such a wonderful job and I'm so excited to share with you the final crochet pattern for this cardigan.

When I first picked up the Bernat Velvet yarn, I knew I wanted to wear it. This cardigan is everything I dreamed it would feel like and more! It's comfortably fitted and feels so soft against the skin, it's incredible.


The wonderful thing about this crochet velvet cardigan pattern is that it is easy to make and uses only basic stitches and construction. If you know how to double crochet, you know how to make this cardigan.

With the velvet yarn being a bulkier yarn, it also doesn't take much time to crochet this cardigan.  I would say in total, it took me 3-4 sittings to make this entire cardigan including the seaming. The yarn is so wonderful to work with, you won't want to put it down!


Something different I did this time around with pattern sizing for a cardigan is adding heights to the sizes. I'm 4'11" so I have always calculated the measurements to suit the average height person when writing the pattern. Well, I know from a lot of you that I'm not the only shorty out here!

You will see in the pattern that I have added instructions on whether you would like to make your cardigan "short, average, tall" in addition to the typical sizing (small, medium, etc). I know how frustrating it can be when you are not the average size so I hope this extra addition to the pattern is helpful for you!


One thing I have to caution you on this yarn is that it is very delicate. When you crochet with it, it is wonderful and frogging (ripping out your finished work) is no issue but when it comes to seaming you need to be careful not to seam too tightly.


I also added in the pattern notes that you may want to use stitch markers to assemble your pieces and try it on to make sure it fits well before moving onto the actual sewing. From experience, taking out sewn pieces results in the yarn coming apart and takes far too much time because it's difficult to see.

Another thing my pattern testers and I have noticed is that since the yarn is so smooth and has not much traction, it's easy for the double crochet stitches to become loose in areas. This will not result in your cardigan coming a part or effect the wear of your cardigan but you may notice small loops forming from the loose stitches. (If anyone has any advice on this - I'd love to know!)

Don't forget to give it a heart as well - thank you so much for your support!

Sharing in any way really helps my blog - thank you!

Free Crochet Pattern for the Velvet Cardigan


Materials

Bernat Velvet 2-3 skeins
2 skeins: XS (short - tall lengths), S (short - tall lengths), M (short length), L (short length) 
3 skeins: M (average - tall length), L (average - tall length), XL-3XL (short - tall lengths)
K/6.50mm hook
Tapestry needle
Scissors
Tape Measure

Pattern notes

The overall construction of the cardigan is as follows: You will begin crocheting the ribbing for the bottom of the back panel of the cardigan and then working the main body of the cardigan. You will continue to work to make the first front panel. You will attach yarn to the back panel to make the second front panel. Front panels will be folded down onto the back panel and sewn up sides leaving room for arm holes. Sleeves will be made separately, folded in half and sewn up the sides and onto the body of the cardigan. Edging will be crocheted around the front panels.

*It is helpful to use stitch markers to piece everything together before sewing just incase you need to adjust the garment to fit you. This yarn is not very forgiving when it comes to taking out sewn pieces.*

Sizes/Fit: This cardigan is comfortably fitted. The front panels will be fairly open and will not cover the entire bust for most sizes. The panels may seem not wide enough until you do the edging. You may add more edging if you’d like. If you are between sizes, I suggest going up a size. 

XS - 28-30” bust
S - 32-34” bust
M - 36-38” bust
L - 40-42” bust
XL - 44-46” bust
2X - 48-50” bust
3X - 52-54” bust

In addition to bust sizes, I have adjustments in the pattern for short, average, and tall heights. I have the cardigan pattern written out so it hits several inches below the hips, but you can make yours as long or as short as you’d like by reviewing the below how long each cardigan will be with height adjustments. You may also choose to make it shorter or longer by decreasing/adding rows for each panel made.
You will see these heights in parentheses when making the back and front panels.

5’2” and below - short (Cardigan will be roughly 28” in height.) 
5’3”-5’7” - average (Cardigan will be roughly 31” in height.)
5’8” and above - tall (Cardigan will be rougly 34” in height.)

Gauge: 4” x 4” ~ 9 st x 5 rows dc

Chain 3 in the beginning of each row DOES count as a stitch

Abbreviations (US terms):
Ch = chain, dc = double crochet, fpdc = front post double crochet, bpdc = back post double crochet, st = stitch(es)

Pattern

Ribbing

Row 1: Ch 38 (40, 42, 46, 48, 52, 56), dc in 4th ch from hook and across, turn (36,38,40,44,46,50,54)
Row 2: Ch 3, *fpdc, bpdc, repeat from * across, fpdc in last st, turn
Repeat Row 2 for 3 more rows

Main body/Back Panel

Row 6: Ch 3, dc across, turn
Repeat Row 6 for 32 (short), 36 (average), 40 (tall) more rows

This will complete the back panel, DO NOT fasten off. We will begin working on one of the front panels that will later be folded down onto the back panel.

Panel One worked off of main body

Row 1: Ch 3, dc into next 17 (18, 19, 21, 22, 24, 26) st, turn (18,19,20,22,23,25,27)
Row 2: Ch 3, dc across, turn
Repeat Row 2 for 30(short), 34 (average), 38(tall) more rows
Continue onto ribbing

Ribbing

Row 1: Ch 3, *fpdc, bpdc, repeat from * across, fpdc in last st if needed
Sizes XS, M, L Repeat Row 1 for 4 more rows
Sizes S, XL, 2X, 3X go to Row 2

Row 2: Ch 3, *bpdc, fpdc, repeat from * across
Sizes S, XL, 2X, 3X, repeat Row 1-2 until you have 5 rows of ribbing ending with Row 1

Fasten off

Panel Two

Attach yarn to main body on the opposite side of where the first panel begins. (Fig. 1)

Repeat instructions from panel one.


Contruction/Assembling Body of Cardigan

Fold panels down and sew up the sides leaving 6.5(7, 7.5, 8, 8.5, 9, 10) inches for each arm hole. (Fig. 2)

This will be the wrong side. Keep it wrong side out for now.


Sleeves

Row 1: Ch 32 (34, 36, 38, 40, 42, 44), dc into 4th ch from hook and across, turn (30,32,34,36,38,40,42)
Row 2: Ch 3, dc decrease, dc in remaining st, turn
Repeat Row 2 for 7(9,11,13,14,14,14) more rows
Ch 3, dc across, turn (22,22,22,22,23,25,27)
Repeat for 12(10, 8, 6, 5, 5, 5) more rows
*Note: If you need to add length to the sleeves, add more rows here. Sleeves are based on arms being ~18” long. Tall sizes may need more length.*
Ribbing
Row 1: Ch 3, *fpdc, bpdc, repeat from * across, fpdc in last st if needed
Sizes XS, S, M, L Repeat Row 1 for 4 more rows
Sizes XL, 2X, 3X go to Row 2

Row 2: Ch 3, *bpdc, fpdc, repeat from * across
Sizes XL, 2X, 3X repeat Row 1-2 until you have 5 rows of ribbing ending with Row 1


Fold in half and whip stitch up the side. This will be the wrong side. Keep it wrong side out. (Fig. 3)

Make 2 sleeves. Sew sleeves onto main body where holes were left for arms. Be sure not to sew too tightly with the velvet yarn. 
Turn inside out, this will now be the right side of your sweater.


Edging

Attach yarn to bottom corner of front panel.
Ch 3, dc evenly up the front panel and down the second front panel (2dc for each row of dc)
Ch 3, *fpdc, bpdc, repeat from * around, fpdc in last st if needed.
Fasten off and weave in ends.
*Note: You may add more edging as you’d like by repeating the last row.

Labels: , ,

Thursday, June 14, 2018

Crochet Stitch Tutorial: Corner to Corner (C2C) with Half Double Crochets

I've been loving the Caron Cotton cakes that came back to Michael's Stores this spring and I'm especially loving the project I'm working on with it!


At first, I wanted to make a rug for one of the doors in my sunroom but I have so much more of this particular color called "Hydrangea" that I want to use them all up to make a small blanket!

I love using the C2C stitch for blankets because I feel they work up fairly quickly. That is, until you are on the decreasing rows and you feel like it will never end! But overall, I love the stitch and that it is worked up diagonally and more importantly - I love that there is no starting chain!

I also feel the C2C stitch is very special to me because I taught my mom this stitch. My mom taught me how to crochet when I was around 8 years old, so it was really special for me to give back and teach her something new.

Ever since I have taught her this stitch, she has used it for so so many scrap blanket projects! She loves taking all of her scraps (and mine!) to make one big blanket for her sofas.

Although I decided to use the C2C stitch, I did make a bit of a change from the usual.  Instead of using double crochets, I decided I would use half double crochets.  I think it gives it a beautiful texture and not as many holes/gaps as the double crochets would!

I've put together a quick tutorial on how to do the C2C stitch with half double crochet. If you are well versed in the corner to corner stitch using double crochet, it's basically the same thing except with half double crochets!

The only minor differences are you chain 5 for the beginning/increases and chain 2 before making the half double crochets into the spaces. You can watch the video for the step by step!

I've included how to make a rectangle OR square with the corner to corner (C2C) stitch.  This way you can make a rectangular blanket or a square dish cloth. You can even make a hat with my Don't Be A Square beanie that uses the C2C stitch!


There are many possibilities with this stitch. I hope you love it as much as I do! Enjoy!


If you don't see the video above, you may need to disable your ad blocker to view it.

Labels: , ,

Wednesday, November 1, 2017

Granny Filet Square Afghan Crochet Pattern

Purchase the ad-free PDF formatted pattern file for this crocheted Granny Filet Square Afghan on Ravelry.
Or find the pattern on my blog below!


Isn't this just the most simple yet perfectly detailed blanket?! I love love love blankets made out of one large granny square, so I made one with a little twist.

For this afghan, I created a large solid granny square with rows of filet to keep it a bit breezy. I love the little detail of the little blocks. I think it makes it look very pretty and delicate.

When I first started this project, I made the little filet squares between only two solid rows but I found that too "hole-y" for my taste. However, that may be right up your alley if you're looking for a very light afghan!

Once you get going on this project, it's a very easy and mindless project that you can do while relaxing and/or watching one of your favorite shows. I worked on this project intermittently between other projects. It was very much my go to project when I wanted to do some mindless stitching.


The best thing about this afghan is that you can make it as large or as small as you'd like. The pattern is a five row repeat and once you get past the first few repeats, you won't need to look at the pattern anymore.

I found that using just two of the regular Caron cakes, it made a nice sized baby blanket. I had 3 Caron cakes in the Blueberry Kiwi  color that is now discontinued, so I used all 3 to make a good sized blanket for my 6 year old son.

When using Caron cakes, the color can change mid-round which may not be favorable but I was okay with that. If do not like your color running together mid-round, I have seen some projects where you cut and attach as needed to make your color changes a little more structured.


Fair warning here - you will have to block your finished project! The larger you make the square, the more it will tend to curl up on the edges and look a bit uneven.

I was told this is the nature of very large squares and although I tried changing up my stitch counts and used different yarns - the verdict was I had to block the project. So keep that in mind!

I know many are not able to use the Caron Cakes because of the wool content in it. However, the line of Caron cakes has expanded and they have included a "Caron Big Cakes".

The Caron Big Cakes are 100% acrylic and have around 600 yards of yarn in just one cake! To me, that sounds like the perfect yarn to make this project!

Want to save it for later?

Add it to your Ravelry queue/favorites

Purchase the PDF ad-free pattern here

PIN it to your Pinterest boards

Pattern notes:

Chain 3 in the beginning of the rounds count as a stitch, when making the next stitch be sure to crochet into the next space and not the same space as the Chain 3.

“Corner” is referring to the chain 2 spaces in each corner of the square.

You may use any type of yarn, just make sure to adjust hook size as needed.

You will need to block your project after completion.

Blanket shown was made with 3 Caron cakes and came out to be approximately 47” x 47” once blocked.
Stitch counts for sides:
*Count your stitches, it may be easy to miss stitches when making a solid granny square especially if you crochet tightly*

Row 1: 3 stitches per side
Row 2: 7 stitches per side
Row 3: 11 stitches per side
Every row after should have 4 stitches more than the last. Filet rows - count DC and chains

Abbreviations:
MR - magic ring
DC - double crochet
Ch - chain

Gauge: 4"x4" ~ 12st x 7rows in DC

Materials:
Worsted weight yarn
H/5.0mm hook
Tapestry needle and scissors to fasten off

Pattern:

Round 1: MR, work the following in the ring: Ch3, 2DC, Ch 2, 3DC, Ch 2, 3DC, Ch 2, 3DC, Ch 2, join to beginning Ch 3

Round 2: Ch 3, *DC in each stitch across until you get to the corner, (2DC, Ch 2, 2DC) all in corner, repeat from * , join to beginning ch 3

Round 3-4: Repeat Round 2

Round 5: Chain 4, skip one stitch, DC, *Ch 1, skip one stitch, DC until you get to the corner, (Ch 1, DC, Ch 2, DC, Ch 1) all in corner.
Start next side by working DC into next stitch and then repeat from *
 until you get back to beginning of round, join to the 3rd space up from the beginning chain

Round 6: Ch 3, *DC in each chain space and DC across until you get to corner, (2DC, Ch 2, 2DC) all in corner, repeat from *
DC until you get back to beginning of round, join to 3rd space up from the beginning chain

Repeat Rounds 2-6 until desired size of blanket is acquired.


Here are a few photos to help you along with the filet rows.

In the filet rounds, begin by chaining up 4 and skip one space, DC into the next
You will always end with a DC before you get to a corner

Filet rounds are joined to the 3rd space up from the beginning chain

Labels: , , , ,