Add next in . Do NOT use www. for the new_domain Maria's Blue Crayon: August 2018

Thursday, August 30, 2018

Chunky Crochet and Knit Pumpkins - Free Patterns

GET THE FREE PDF PATTERN DOWNLOAD FOR THESE CHUNKY KNIT AND CROCHET PUMPKINS BELOW.


These chunky knit and crochet pumpkins are so squishy and adorable! Topped with a delicious smelling cinnamon stick, they are the perfect fall decor for your home! 

Because I used a super bulky yarn, they were so quick to make! To be honest, I usually have a hard time finding unique patterns using super bulky yarn so I thought I would make these pumpkins to use up some super bulky yarn I had. 


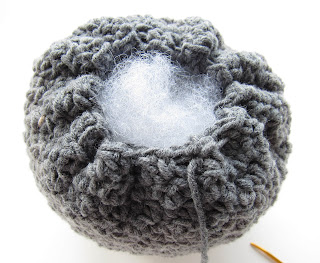
The pumpkin that is a grayish blue color is knit and the oatmeal tweed pumpkin is crochet. The knit pumpkin is just a simple knit stitch in the round. I learned how to knit last year and although I love it, I don't knit as much as I'd like to so I thought it would be fun to make two different versions of pumpkins. Win win for the knitter, crocheter, and the bistitchual!


The crochet version uses the knit stitch (also called the waist coat stitch). I love the way the knit stitch looks, but to be perfectly honest I do find knitting it more enjoyable!

The knit stitch/waist coat stitch can become rather tight. If you're a tight crocheter, I suggest trying your best to crochet as loosely as possible. You'll find a quick video on how to make the knit stitch below.


These pumpkins are already set as a centerpiece in my house and I love it! My puppy even loves it so much, he managed to eat part of the cinnamon stick stem. I should have known - he was eyeing them up when I was setting them out to take photos!

I hope you enjoy making these pumpkins as much as I did! Please share with me over on Facebook
and Instagram!


PIN IT TO YOU CROCHET/FALL BOARDS ON PINTEREST.

DOWNLOAD THE FREE AD-FREE PDF.


Materials
Lion Brand Hometown USA (super bulky yarn)
P/11.50mm hook (for crochet)
9.0mm 16” circular needles (for knit)
Poly-fil Stuffing
Cinnamon Sticks and twine for stem
Tapestry and Scissors

Pattern notes
The pumpkin will be made by working in the round then sewn and cinched up at the top and bottom to create the sphere. We will additionally add grooves to the side with yarn and needle.

Adjusting Pumpkin size: If you would like to make multiple pumpkins in different sizes, simply add or subtract the number of beginning stitches/cast on stitches as well as the number of rows. I suggest adding/subtracting in multiples of 10 for the beginning stitches and adding/subtracting in multiples of 2-3 for the number of rows.

Beginning Chain 2 does not count as a stitch. (crochet)

Special stitches: knit stitch/waistcoat stitch (crochet)

You may need to use the magic loop method as the stitches will be quite stretched around the circular needles. (knit)

Abbreviations (US terms):
Ch = chain, sc = single crochet, st = stitch(es), k1 = knit one

Dimensions:
Crochet pumpkin - 7” in diameter
Knit pumpkin - 5” in diameter

Crochet Pattern

Round 1: Ch 27, join to first ch
Round 2: Ch 1, sc around, join to first sc
Round 3-15: Ch 1, knit stitch in each st around, join to first st
Fasten off and leave long tail (~3ft, more if you are making a larger pumpkin). Follow assembly instructions.
Add cinnamon stick and twine for stem.

Knit Pattern

Round 1: Cast on 30 st
Round 2-18: K1 in each st around
Bind off and leave long tail (~3ft, more if you are making a larger pumpkin).  Follow assembly instructions.
Add cinnamon stick and twine for stem.

The assembly instructions are the same as my Lil Dollop Pumpkins - learn how to assemble your pumpkins here.

Labels: , , ,

Saturday, August 25, 2018

Halloween Cat Applique and Granny Square - Free Crochet Pattern

This crochet cat granny square is a part of my Halloween Blanket Crochet Along. Click here to see the other squares.


For Week #8 of the CAL we will be making 4 gray squares, 4 black squares, and 4 cat appliques that will be sewn onto the gray squares.

This will be the last of the granny squares!! We are in the home stretch. Next week, we will be working on joining our squares and making a border for the blanket! Yay!

Watch the video to help you through and find the materials needed & free written pattern below!


Crochet Cat Applique Free Patttern

Materials
Black, white, and pink yarn
G/4.00 mm hook
2 6mm safety eyes
Tapestry needle & Scissors

Notes
Abbrevations (US terms)
Ch = chain, hdc = half double crochet, sc = single crochet, sc3tog = single crochet three together (triple decrease), st = stitch(es)

Using black
Round 1: Magic ring, 10 hdc in ring, join to first hdc (10)
Round 2: Ch 2, 2hdc in each st around, join to first hdc (20)
Round 3: Ch 2, *2hdc, hdc, repeat from * around, join to first hdc (30)
Round 4: Ch 2, *2hdc, hdc in next 2 st, repeat from * around, join to first hdc (40)
DO NOT fasten off

Ears
Ch 1, sc in next 3 st, turn
Ch 1, sc3tog
Fasten off
Attach black yarn 3 spaces away from first ear
Ch 1, sc in next 3 st, turn
Ch 1, sc3tog
Fasten off

Face
Attach safety eyes
Sew on nose and whiskers using white/pink yarn and tapestry needle

LEARN HOW TO SEW ON APPLIQUES HERE

Granny Square Crochet Pattern

Use J/6.00mm hook

Chain 2 in beginnging of round does not count as stitch

Abbreviations (US terms)
Ch = chain, dc = double crochet, hdc = half double crochet, st = stich(es)

Dimensions: Approx. 6.5" square

Round 1: Magic ring, Ch 2, 10dc into magic ring, join to first dc
Round 2: Ch 2, 2dc into each st around, join to first dc
Round 3: Ch 2, *dc, hdc into next 2 st, dc, [2dc, ch 2, 2dc] all in one st, repeat from * , join to first dc (8 st per side)
Round 4: Ch 2, *dc until you get to the ch 2 space from previous row, [2dc, ch 2, 2dc] all in ch 2 space, repeat from * , dc in next 2 spaces until you get to the beginning of the round, join to first dc (12 st per side)
Round 5: Ch 2, *dc until you get to the ch 2 space from previous row, [2dc, ch 2, 2dc] all in chain 2 space, repeat from * , dc in next 4 spaces until you get to the beginning of the round, join to first dc (16 st per side)
Fasten off and weave in all ends.

The video for the granny square is the same as the Christmas square EXCEPT use a J/6.00mm hook and fasten off after the 5th row. The square will be approx. 6.5"


Labels: , ,

Tuesday, August 21, 2018

Lil Dollop Pumpkins - Free Crochet Pattern

Get ready for Fall with these Lil Dollop Crochet Pumpkins! 
(Each sale helps my blog running and helps support my family, thank you!)
OR Scroll down for the free pattern


I'm a big fan of the fall season, so I'm really excited to share these crochet pumpkins with you!

I was at Hobby Lobby the other week and I saw the cutest little cakes of yarn called "Lil Dollop" by Yarn Bee.  They came in adorable colors and I knew instantly they would be perfect for pumpkins!


They aren't the traditional pumpkin colors, but I think that's what makes it so fun! I made them in three different sizes so they could be arranged together.

The 'largest' pumpkin uses almost the entire skein, so it's the perfect project for these little skeins! The others are a tad smaller and will not use the entire skein but will use most of it.


These crochet pumpkins are quick to make and has a subtle texture that makes these pumpkins so adorable! Paired with the color changing yarn, they are extra cute!

If you would like traditional colored pumpkins or if you want your pumpkin a solid color, feel free to use any worsted weight yarn you would like! You can also use bulkier sized yarns (adjust hook size as needed) to make larger pumpkins. Play around with the sizes and have fun!

Fabric pumpkins seem to be really in at the moment and I love it! Place these on your mantle, as a center piece, side tables, or coffee table for a touch of fall in your home!

I think they even look really cute stacked up on top of each other! You can either secure them stacked up with a bit of hot glue or if you'd like the option of keeping them together or separate, attach them with a bit of yarn to stay together. When you want to free them for a different look, just snip the yarn!


Materials
1 skein Yarn Bee Lil Dollop (Applessence, Watermelon Whisper, Midnight Truffle - 92yards each)
Small amount dark brown worsted weight yarn for stem
G/4.00mm hook
Poly-fil stuffing
Tapestry needle
Scissors

Pattern notes
The pumpkin will be made by working in the round then sewn and cinched up at the top and bottom to create the sphere. We will additionally add grooves to the side with yarn and needle.

Beginning Chain 2 does not count as a stitch.

We will be working in the round as well as turning our work after each round. Note that when we turn our work, the first stitch we will be working into is as shown in photo. We will always work into that single crochet from the previous row. (This DOES NOT apply to the first round 2 as we have no turned yet, in that case we will work into that very first stitch).


Abbreviations (US terms):

Ch = chain, sc = single crochet, dc = double crochet, st = stitch(es)

Free Crochet Pattern


Small: 4” diameter x 3” high
Round 1: Ch 30, join to first ch careful not to twist
Round 2: Ch 2, *dc, sc, repeat from * around, join to first dc, TURN (30)
Repeat round 2 until you have a total of 16 rows
Fasten off and leave a very long tail (~3-4 ft) and follow the assembly instructions below.


Medium: 5” diameter x 4” high
Round 1: Ch 50, join to first ch careful not to twist
Round 2: Ch 2, *dc, sc, repeat from * around, join to first dc, TURN (50)
Repeat round 2 until you have a total of 20 rows
Fasten off and leave a very long tail (~3-4 ft) and follow the assembly instructions below.


Large: 5” diameter x 5” high
Round 1: Ch 50, join to first ch careful not to twist
Round 2: Ch 2, *dc, sc, repeat from * around, join to first dc, TURN (50)
Repeat round 2 until you have a total of 25 rows
Fasten off and leave a very long tail (~3-4 ft) and follow the assembly instructions below.

Stem - use dark brown yarn
Round 1: Magic ring, ch 1, 4sc in ring, join to first sc
Round 2: Ch 1, 2sc in each st around, join to first sc
Round 3-5: Ch 1, sc around, join to first sc. Fasten off and sew onto top of pumpkin.

Assembly Instructions


1. This is what your work will look like after fastening off.


2. Use a separate piece of yarn to sew the bottom up. Weave in and out of the bottom stitches all the way around.


3. Pull tight and tie yarn ends together. Hide them on the inside of the pumpkin.


4. Stuff with poly-fil.


5. Use the long tail to weave in and out of the top stitches of the pumpkin.


6. Pull tight to cinch together and add more poly-fil as needed. Don’t worry if there is a small hole you can’t close, this will be covered by the stem.

Knot the yarn, do not cut off.


7. Take the yarn tail and insert into the bottom of the pumpkin with needle. We will now be making the grooves around the pumpkin.


8. Pull the needle up through the center to the top of the pumpkin. Pull tight (enough to make an indentation to form the grooves). Continue to make equal sectioned grooves by inserting the needle into the bottom and up through the top. I did this 6 times for a total of 7 sections/bumps. Knot and weave in ends.


Labels: , ,

Monday, August 20, 2018

Best Free Crochet Patterns - In Stitches Link Up Party #17

Find the best free crochet patterns that we have rounded up this week at the In Stitches Link Up Party! You will find a variety of free crochet patterns this week from our round up as well as the hosts ranging from crochet scrubbies to wearables!


Find the links below for the top 5 free crochet patterns from this week's round up!

1. Herrinbgone Baby Skirt by Winding Road Crochet
2. Diamond in the Rough Headband by Rich Textures Crochet
3. C2C Washcloth by Eye Love Knots
4. Seeing Spirals Wash Cloth by Winding Road Crochet
5. Actus Shawl by Joy of Motion


Keep Scrolling for more free patterns! Be sure to click on your favorites at the bottom!

Find more free crochet patterns in past week's link up parties here!

Every other Monday, you will find a round up of the Top 5 Best Free Crochet Patterns! Plus, we (the hosts) will be sharing our own latest free crochet patterns on our blog. Throughout the week, links will be added so be sure to keep an eye on what others have to share as well!

If you are a crochet blogger that has free patterns to share, this is a great party for you to get your work out there! Simply follow the instructions below to 'link up' your free crochet patterns each week. If you are in the top 5 (most clicked patterns), your pattern will be shared and promoted by all of the crochet bloggers hosting this party! You can find more details below.

I am hosting this link up party right here on Maria's Blue Crayon, as well as on, Nicki's Handmade Crafts, Naztazia, Salty Pearl Crochet and The Unraveled Mitten. We are really excited to start this link up party and hope you join along!

Be sure to check out our social media pages and follow us for more crochet patterns and inspiration!


Find our newest and free crochet patterns at the links below!


Ready to join In Stitches - The Best Free Crochet Pattern Party?

Want to add your link? Please remember to link to your actual project URL and not your homepage URL, and use the name of your project or post, not your own name. Just click the blue “Add Link” button below!

Please visit at least one other link, you just might find a new favorite project! AND – your clicks are how we determine which projects to feature each week! Feel free to leave a comment at the pattern link to provide feedback and show support.

No Etsy stores, Facebook pages, giveaways, or other link parties. Just blog posts to your actual crochet patterns that are accessible for FREE!

If your project gets featured as a top link, please do not submit that same project to future parties. We want to party fair! :)

Now let's get this party started! Please remember that the links below are shown in random order and are not shown according to when they were submitted or how many votes they received so far.


Labels: ,

Saturday, August 18, 2018

Halloween Spider Applique and Granny Square - Free Crochet Pattern

This crochet spider granny square is a part of my Halloween Blanket Crochet Along. Click here to see the other squares.


For Week #7 of the CAL we will be making 4 gray squares, 4 black squares, and 4 spider  appliques that will be sewn onto the gray squares.

This spider is so easy and quick to make - but I have to warn you, it is a pain to sew onto the square. Don't worry, it is worth it since it looks so cool! Watch the video to help you through and find the materials needed & free written pattern below!


Crochet Spider Applique Pattern

Materials
Black yarn
G/4.00mm hook
Tapestry needle & Scissors

Notes
Leave tail after making each spider leg for sewing onto granny square.

The photo below helps show you where the legs go.

Abbreviations (US terms)
Ch = chain, hdc = half double crochet, dc = double crochet

Round 1: Magic ring, 3hdc, 3dc, 6hdc, 3dc, 3hdc, join to first hdc, ch 9, fasten off
(Ch 9 makes the first leg of the spider.)
Attach yarn next to last leg, ch 5, fasten off
Attach yarn two spaces away from leg, ch 5, fasten off
Attach yarn next to last leg, ch 9, fasten off
Attach yarn 3 space away from last leg, ch 9, fasten off
Attach yarn next to last leg, ch 5, fasten off
Attach yarn 2 spaces away from last leg, ch 9, fasten off

Sew onto granny square arranging the legs as shown in picture above.


Learn how to Sew on Appliques here.

Granny Square Crochet Pattern

Use J/6.00mm hook

Chain 2 in beginnging of round does not count as stitch

Abbreviations (US terms)
Ch = chain, dc = double crochet, hdc = half double crochet, st = stich(es)

Dimensions: Approx. 6.5" square

Round 1: Magic ring, Ch 2, 10dc into magic ring, join to first dc
Round 2: Ch 2, 2dc into each st around, join to first dc
Round 3: Ch 2, *dc, hdc into next 2 st, dc, [2dc, ch 2, 2dc] all in one st, repeat from * , join to first dc (8 st per side)
Round 4: Ch 2, *dc until you get to the ch 2 space from previous row, [2dc, ch 2, 2dc] all in ch 2 space, repeat from * , dc in next 2 spaces until you get to the beginning of the round, join to first dc (12 st per side)
Round 5: Ch 2, *dc until you get to the ch 2 space from previous row, [2dc, ch 2, 2dc] all in chain 2 space, repeat from * , dc in next 4 spaces until you get to the beginning of the round, join to first dc (16 st per side)
Fasten off and weave in all ends.

The video for the granny square is the same as the Christmas square EXCEPT use a J/6.00mm hook and fasten off after the 5th row. The square will be approx. 6.5"

Labels: , ,

Saturday, August 11, 2018

Halloween Candy Corn Granny Square - Free Crochet Pattern


This crochet candy corn granny square is a part of my Halloween Blanket Crochet Along. Click here to see the other squares.

For Week #6 of the CAL we will be making 4 gray squares, 4 orange squares, and 4 candy corn appliques that will be sewn onto the gray squares.

This crochet candy corn has some color changing, but is very easy to make! :) Watch the video to help you through and find the materials needed & free written pattern below!


Crochet Candy Corn Applique Free Pattern

Materials
Orange, yellow, and white yarn
G/4.00mm hook
Tapestry needle and Scissors

Notes
Abbreviations (US terms)
Ch = chain, hdc = half double crochet, hdc2tog = half double crochet two together (half double crochet decrease), hdc3tog = half double crochet three together (triple decrease) st = stitch(es)

Using yellow
Row 1: Ch 12, hdc in 2nd ch from hook and across, turn (11)
Row 2: Ch 1, hdc2tog, hdc in next 7 st, hdc2tog, turn (9)
Change to orange
Row 3: Ch 1, hdc across, turn (9)
Row 4: Ch 1, hdc2tog, hdc in next 5 st, hdc2tog, turn (7)
Change to white
Row 5: Ch 1, hdc2tog, hdc in next 3 st, hdc2tog, turn (5)
Row 6: Ch 1, hdc2tog, hdc, hdc2tog, turn (3)
Row 7: Ch 1, hdc3tog (1)
Fasten off and leave tail for sewing onto granny square

Learn how to Sew on Your Appliques here!

Granny Square Crochet Pattern

Use J/6.00mm hook

Chain 2 in beginnging of round does not count as stitch

Abbreviations (US terms)
Ch = chain, dc = double crochet, hdc = half double crochet, st = stich(es)

Dimensions: Approx. 6.5" square

Round 1: Magic ring, Ch 2, 10dc into magic ring, join to first dc
Round 2: Ch 2, 2dc into each st around, join to first dc
Round 3: Ch 2, *dc, hdc into next 2 st, dc, [2dc, ch 2, 2dc] all in one st, repeat from * , join to first dc (8 st per side)
Round 4: Ch 2, *dc until you get to the ch 2 space from previous row, [2dc, ch 2, 2dc] all in ch 2 space, repeat from * , dc in next 2 spaces until you get to the beginning of the round, join to first dc (12 st per side)
Round 5: Ch 2, *dc until you get to the ch 2 space from previous row, [2dc, ch 2, 2dc] all in chain 2 space, repeat from * , dc in next 4 spaces until you get to the beginning of the round, join to first dc (16 st per side)
Fasten off and weave in all ends.

The video for the granny square is the same as the Christmas square EXCEPT use a J/6.00mm hook and fasten off after the 5th row. The square will be approx. 6.5"


Are you enjoying this themed granny square blanket? 
BE SURE TO CHECK OUT MORE OF MY THEMED BLANKETS
ALL FREE PATTERNS


Labels: , ,

Monday, August 6, 2018

Best Free Crochet Patterns - In Stitches Link Up Party #16

Get ready for the best free crochet patterns that we have rounded up for you!! Be sure to scroll to the bottom to see what's being submitted! So many free crochet patterns here!


Find the links below for the top 5 free crochet patterns from this week's round up!

1. Field and Furrows Afghan by Crochet 365 Knit Too
2. Jelly Fish Ragdoll by Yarnhild
3. Country Coasters by Rich Texture Crochet 
4. Amigurumi Polar Bear by Grace and Yarn
5. Soft Easy Crochet Shawl by Joy of Motion


Keep Scrolling for more free patterns! Be sure to click on your favorites at the bottom!

Find more free crochet patterns in past week's link up parties here!

Every other Monday, you will find a round up of the Top 5 Best Free Crochet Patterns! Plus, we (the hosts) will be sharing our own latest free crochet patterns on our blog. Throughout the week, links will be added so be sure to keep an eye on what others have to share as well!

If you are a crochet blogger that has free patterns to share, this is a great party for you to get your work out there! Simply follow the instructions below to 'link up' your free crochet patterns each week. If you are in the top 5 (most clicked patterns), your pattern will be shared and promoted by all of the crochet bloggers hosting this party! You can find more details below.

I am hosting this link up party right here on Maria's Blue Crayon, as well as on, Nicki's Handmade Crafts, Naztazia, Salty Pearl Crochet and The Unraveled Mitten. We are really excited to start this link up party and hope you join along!

Be sure to check out our social media pages and follow us for more crochet patterns and inspiration!


Find our newest and free crochet patterns at the links below!


Ready to join In Stitches - The Best Free Crochet Pattern Party?

Want to add your link? Please remember to link to your actual project URL and not your homepage URL, and use the name of your project or post, not your own name. Just click the blue “Add Link” button below!

Please visit at least one other link, you just might find a new favorite project! AND – your clicks are how we determine which projects to feature each week! Feel free to leave a comment at the pattern link to provide feedback and show support.

No Etsy stores, Facebook pages, giveaways, or other link parties. Just blog posts to your actual crochet patterns that are accessible for FREE!

If your project gets featured as a top link, please do not submit that same project to future parties. We want to party fair! :)

Now let's get this party started! Please remember that the links below are shown in random order and are not shown according to when they were submitted or how many votes they received so far.


Labels:

Sierra Beanie - Free Crochet Pattern


Get the free crochet pattern for the Sierra Beanie by scrolling down!


My first hat of the year! It's August, so it's basically Fall, right?! I know some may want summer to slow down, but I'm all about Fall!

This beanie is part of the Christmas Hat Crochet Along that my blogger friends Katie (Salty Pearl Crochet) and Heather (The Unraveled Mitten) are hosting! It's a crochet along that includes 9 hat patterns from different designers - all hat patterns perfect for gift giving!

Get a head start on your Christmas making! Find all the patterns from the different designers here. (Runs through August 10th)


I have so many great things to say about this beanie! First of all, you can wear it TWO ways! You can wear it as a slouchy or fold up the brim for a less slouchy look.

Also, I love the pom pom addition! You can make a yarn pom pom but I love the look of a big poofy faux fur pom pom. 


Another great aspect? This beanie is so adorable and perfect for gift giving! Who wouldn't want a pretty textured crochet beanie to keep them warm? Make it in neutrals to go with practically any outfit/winter coat or use a color for a great pop of color to add to an outfit!


I used Yarn Bee's Rustic Romantic and the subtle flecks worked so well with the texture of this hat! It is a worsted weight yarn, and you may substitute any other worsted weight yarn. I would caution against I Love This Yarn! and Red Heart Super Saver, as those seem to be a 'thicker' worsted weight and can make your hat too large. However, I'm not the boss of your crochet and you can use what ever you'd like!

Not ready to make this crochet beanie yet?

SAVE IT AND/OR PURCHASE ON RAVELRY HERE

PIN IT ON YOUR PINTEREST BOARDS

Free Crochet Pattern for Sierra Beanie

Materials

1 skein Yarn Bee Rustic Romantic (Faded Porch Swing)
H/5.00mm hook
Tapestry needle & Scissors
Large Faux Fur Pom Pom

Pattern notes

The beanie will be worked from the brim up.

Fits adult head ~21”. Beanie can be worn two ways - slouchy or with brim folded up for a less slouchy look.

Size adjustments: The brim should be 1-2” smaller than head circumference. Make the beanie smaller or larger by decreasing/increasing the number of rows for the brim. Make sure rows for the brim is an even number. 

Gauge: 4” x 4” ~ 14 st x 8 rows in double crochet

Abbreviations (US terms):
Ch = chain, sc = single crochet, dc = double crochet, fpdc = front post double crochet, bpdc = back post double crochet

Pattern

Brim

Row 1: Ch 10, sc in 2nd ch from hook and across, turn (9)
Row 2: Ch 1, sc in back loops only across, turn (9)

Repeat Row 2 until you have a total of 66 rows 

Ch 1 and slip stitch the last and first rows together to form brim.

Turn 90 degrees to work on the side of the rows. *Do not fasten off*

Body 

Round 1: Ch 2, dc into each side of sc from the brim, join to first dc (66)
Round 2: Ch 2, dc around, join to first dc
Round 3: Repeat Round 2
Round 4: Ch 2, *fpdc, bpdc, repeat from * around, join to first dc 
Round 5: Ch 2, *bpdc, fpdc, repeat from * around, join to first dc
Round 6-8: Ch 2, dc around, join to first dc

Repeat Rounds 4-8 three more times.

Fasten off, leave long tail.

Weave in and out of the top stitches, pull tight and secure. Weave in ends and attach pom pom.

Labels: ,

Saturday, August 4, 2018

Halloween Pumpkin Granny Square - Free Crochet Pattern


This crochet pumpkin granny square is a part of my Halloween Blanket Crochet Along. Click here to see the other squares.

For Week #5 of the CAL we will be making 4 gray squares, 4 orange squares, and 4 pumpkin appliques that will be sewn onto the gray squares.

This pumpkin is super quick to make! You'll get them done in no time. :) Watch the video to help you through and find the materials needed & free written pattern below!


Pumpkin Applique Crochet Pattern

Materials
Orange and green yarn
G/4.00mm hook
Tapestry needle and scissors
Notes
Abbreviations (US terms)
Ch = chain, hdc = half double crochet, dc = double crochet, tr = treble crochet, st = stitch(es), sl st = slip stitch

Round 1: Magic ring, ch 1, 10 hdc in ring, join to first hdc (10)
Round 2: Ch 1, 2hdc in each st around, join to first hdc (20)
Round 3: Ch 2, dc in next 3 st, hdc around, dc in last 3 st, sl st into same st as last dc (20)
Fasten off and leave tail for sewing onto granny square.
Using green
Attach yarn into same st as last sl st for round 3
Ch 3, tr in same st as ch 3, ch 3, sl st into next st
Fasten off and leave small tail for sewing onto granny square

Lean how to Sew on Appliques to your granny square here!

Granny Square Crochet Pattern

Use J/6.00mm hook

Chain 2 in beginnging of round does not count as stitch

Abbreviations (US terms)
Ch = chain, dc = double crochet, hdc = half double crochet, st = stich(es)

Dimensions: Approx. 6.5" square

Round 1: Magic ring, Ch 2, 10dc into magic ring, join to first dc
Round 2: Ch 2, 2dc into each st around, join to first dc
Round 3: Ch 2, *dc, hdc into next 2 st, dc, [2dc, ch 2, 2dc] all in one st, repeat from * , join to first dc (8 st per side)
Round 4: Ch 2, *dc until you get to the ch 2 space from previous row, [2dc, ch 2, 2dc] all in ch 2 space, repeat from * , dc in next 2 spaces until you get to the beginning of the round, join to first dc (12 st per side)
Round 5: Ch 2, *dc until you get to the ch 2 space from previous row, [2dc, ch 2, 2dc] all in chain 2 space, repeat from * , dc in next 4 spaces until you get to the beginning of the round, join to first dc (16 st per side)
Fasten off and weave in all ends.

The video for the granny square is the same as the Christmas square EXCEPT use a J/6.00mm hook and fasten off after the 5th row. The square will be approx. 6.5"

Labels: , ,