Lil Dollop Pumpkins - Free Crochet Pattern
Get ready for Fall with these Lil Dollop Crochet Pumpkins!
(Each sale helps my blog running and helps support my family, thank you!)
OR Scroll down for the free pattern
I'm a big fan of the fall season, so I'm really excited to share these crochet pumpkins with you!
I was at Hobby Lobby the other week and I saw the cutest little cakes of yarn called "Lil Dollop" by Yarn Bee. They came in adorable colors and I knew instantly they would be perfect for pumpkins!
They aren't the traditional pumpkin colors, but I think that's what makes it so fun! I made them in three different sizes so they could be arranged together.
The 'largest' pumpkin uses almost the entire skein, so it's the perfect project for these little skeins! The others are a tad smaller and will not use the entire skein but will use most of it.
These crochet pumpkins are quick to make and has a subtle texture that makes these pumpkins so adorable! Paired with the color changing yarn, they are extra cute!
If you would like traditional colored pumpkins or if you want your pumpkin a solid color, feel free to use any worsted weight yarn you would like! You can also use bulkier sized yarns (adjust hook size as needed) to make larger pumpkins. Play around with the sizes and have fun!
Fabric pumpkins seem to be really in at the moment and I love it! Place these on your mantle, as a center piece, side tables, or coffee table for a touch of fall in your home!
I think they even look really cute stacked up on top of each other! You can either secure them stacked up with a bit of hot glue or if you'd like the option of keeping them together or separate, attach them with a bit of yarn to stay together. When you want to free them for a different look, just snip the yarn!
1 skein Yarn Bee Lil Dollop (Applessence, Watermelon Whisper, Midnight Truffle - 92yards each)
Small amount dark brown worsted weight yarn for stem
G/4.00mm hook
Poly-fil stuffing
Tapestry needle
Scissors
Pattern notes
The pumpkin will be made by working in the round then sewn and cinched up at the top and bottom to create the sphere. We will additionally add grooves to the side with yarn and needle.
Beginning Chain 2 does not count as a stitch.
We will be working in the round as well as turning our work after each round. Note that when we turn our work, the first stitch we will be working into is as shown in photo. We will always work into that single crochet from the previous row. (This DOES NOT apply to the first round 2 as we have no turned yet, in that case we will work into that very first stitch).
Abbreviations (US terms):
Ch = chain, sc = single crochet, dc = double crochet, st = stitch(es)
Free Crochet Pattern
Small: 4” diameter x 3” high
Round 1: Ch 30, join to first ch careful not to twist
Round 2: Ch 2, *dc, sc, repeat from * around, join to first dc, TURN (30)
Repeat round 2 until you have a total of 16 rows
Fasten off and leave a very long tail (~3-4 ft) and follow the assembly instructions below.
Medium: 5” diameter x 4” high
Round 1: Ch 50, join to first ch careful not to twist
Round 2: Ch 2, *dc, sc, repeat from * around, join to first dc, TURN (50)
Repeat round 2 until you have a total of 20 rows
Fasten off and leave a very long tail (~3-4 ft) and follow the assembly instructions below.
Large: 5” diameter x 5” high
Round 1: Ch 50, join to first ch careful not to twist
Round 2: Ch 2, *dc, sc, repeat from * around, join to first dc, TURN (50)
Repeat round 2 until you have a total of 25 rows
Fasten off and leave a very long tail (~3-4 ft) and follow the assembly instructions below.
Stem - use dark brown yarn
Round 1: Magic ring, ch 1, 4sc in ring, join to first sc
Round 2: Ch 1, 2sc in each st around, join to first sc
Round 3-5: Ch 1, sc around, join to first sc. Fasten off and sew onto top of pumpkin.
Assembly Instructions
1. This is what your work will look like after fastening off.
2. Use a separate piece of yarn to sew the bottom up. Weave in and out of the bottom stitches all the way around.
3. Pull tight and tie yarn ends together. Hide them on the inside of the pumpkin.
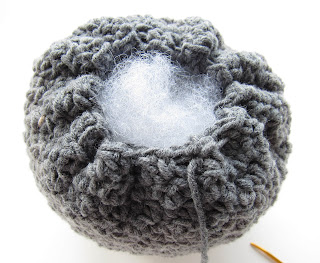
4. Stuff with poly-fil.
5. Use the long tail to weave in and out of the top stitches of the pumpkin.
6. Pull tight to cinch together and add more poly-fil as needed. Don’t worry if there is a small hole you can’t close, this will be covered by the stem.
Knot the yarn, do not cut off.
7. Take the yarn tail and insert into the bottom of the pumpkin with needle. We will now be making the grooves around the pumpkin.
8. Pull the needle up through the center to the top of the pumpkin. Pull tight (enough to make an indentation to form the grooves). Continue to make equal sectioned grooves by inserting the needle into the bottom and up through the top. I did this 6 times for a total of 7 sections/bumps. Knot and weave in ends.
Labels: crochet, home decor, homedecor


<< Home