Add next in . Do NOT use www. for the new_domain Maria's Blue Crayon: July 2017

Sunday, July 30, 2017

Ocean Granny Square Afghan


I'm so incredibly thrilled to be sharing with you the completed Ocean Afghan! This has been a work of love since May and I enjoyed bringing this together right to the very end.

If you've been around, you know this is my second themed granny square afghan. My first themed afghan was the Woodland Afghan that I finished back in March. That one was much larger than this afghan.


As you can see with this blanket, it's much smaller and packed with a lot of color and character! Of  course, this project can be made as large as preferred with 15 different ocean creatures to play around with.


I used pretty blue tones for the solid granny squares in Lion Brand Vanna's Choice. The color did not disappoint - each color is rich and the texture of this yarn is soft and squishy! Perfect for this baby sized afghan.

I made simple white squares to allow each design to be showcased between the solid squares in a checkered pattern. Each design is unique and together it pulls the whole afghan together into a pretty and fun ocean theme.


To make this afghan yourself, you can click the link above to find the post on my blog that contains all the links to the individual designs as well as the pattern for the granny square and layout of this afghan.

I also have a PDF file for patterns and instructions of this whole afghan that you can purchase on Etsy or Ravelry. This file for purchase is for all 15 design patterns, granny square pattern, layout - everything you need to make this afghan all in one PDF file for your convenience that you can print or download to your computer/device! You can find the links above to purchase.


Labels: , , , ,

Crochet Clownfish Applique and Granny Square Free Crochet Pattern - Ocean Themed Blanket


OR SCROLL DOWN FOR THE FREE CLOWNFISH CROCHET PATTERN.


The Clownfish is the 15th and final square of my Ocean Afghan. To find all the information about this Afghan click here.

I can't tell you how happy I am to be sharing with you the last and final square of the Ocean Afghan! 

This guy has a lot of color changing and ends to weave in, but it's worth it! He adds a really fun pop of color to the afghan. Whip up this little guy, and get started on joining those squares!


Materials
Worsted weight yarn in orange, black, white
6mm safety eye (can be substituted by sewing on with black yarn)
E hook
G hook
Tapestry needle and scissors

Amazon Picks:


Pattern notes:

SC2TOG: single crochet 2 together (AKA SC decrease) - Insert hook into first stitch, pull up a loop, insert hook into second stitch, pull up a loop, YO, pull through all loops on hook.

SC3TOG: single crochet 3 together - Insert hook into stitch, pull up a loop, repeat for 2 more stitches, YO, pull through all loops on hook


Pattern

Using E hook and starting with orange yarn:

Row 1: Chain 4, SC into second chain from hook and the next 2 across, turn your work
Row 2: Chain 1, 2SC, SC, 2SC, turn
Row 3: Chain 1, 2SC, SC in next 3, 2SC, turn
Change to black
Row 4: Chain 1, SC across, turn
Change to White
Row 5: Chain 1, SC across, turn
Change to Black
Row 6: Chain 1, SC across, turn
Change to Orange
Row 7: Chain 1, SC across
Row 8: Chain 2, DC in next 2 stitches, SC into next 3 stitches, DC into last 2 stitches, turn
Change to Black
Row 9: Chain 1, SC across
Change to White
Row 10: Chain 1, SC into next 2 stitches, DC into next 3 stitches, SC into last 2 stitches, turn
Change to Black
Row 11: Chain 1, SC across, turn
Change to Orange
Row 12: Chain 1, SC2tog, Sc into next 3 stitches, SC2tog, turn
Row 13: Chain 1, SC2tog, SC, SC2tog, turn
Row 14: Chain 1, SC3tog, turn
Row 15: Chain 1, 2SC, turn
Row 16: Chain 1, 2SC in each stitch across, turn
Row 17: Chain 1, 2SC in each stitch across, turn
Change to Black
Row 18: Chain 1, SC across, fasten off

Fins - Using G hook and starting with orange

Attach yarn to top middle orange section of the body.
Chain 1, HDC, DC, HDC, slip stitch into same stitch last HDC was made, fasten off.
Attach black yarn to just made fin and single crochet around, fasten off

Attach yarn to last black stripe on top of the body
Chain 1, HDC in next 3 stitches, slip stitch into same stitch last HDC was made, fasten off
Attach black yarn to just made fin and single crochet around, fasten off

Attach yarn to underside of body 1 stitch away from the tail
Chain 1, HDC in next 3 stitches, slip stitch into same stitch last HDC was made, fasten off
Attach black yarn to just made fin and single crochet around, fasten off

Side fin - using E hook and starting with orange yarn
Make a slip knot, chain 3, SC into second chain from hook and next stitch, turn
Chain 1, 2SC in each stitch, turn
Change to black
Chain 1, SC across, fasten off

Attach safety eye or sew on with black yarn and tapestry needle.

Labels: , , ,

Sunday, July 23, 2017

Crochet Octopus Applique and Granny Square Free Crochet Pattern - Ocean Themed Blanket


OR SCROLL DOWN FOR THE FREE OCTOPUS CROCHET PATTERN.


The Octopus is the 14th square of my Ocean Afghan. To find all the information about this Afghan click here.

This little purple octopus was so fun to make! Only one more design to go, and the ocean afghan will be complete! If you don't want to miss out be sure to follow me on social media and/or sign up for my mailing list on the side bar!


PIN IT TO YOUR CROCHET BOARD ON PINTEREST.

Materials
Worsted weight yarn in Light Purple
G hook
6mm safety eyes (can be substituted by sewing on with black yarn)
Tapestry needle and scissors

Amazon Picks (affiliate links):


Pattern

Body

Round 1: Magic ring, 10HDC into ring, join to first HDC
Round 2: Chain 1, 2HDC into each stitch, join to first HDC
Round 3: Chain 1, Sc in next 7 stitches, 2HDC into next 3 stitches, DC, 2DC, DC, 2DC, 2 HDC into next 3 stitches, SC into last 3 stitches, join to first SC, do not fasten off

Tentacles
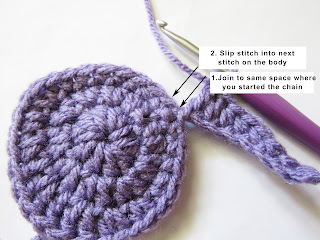
*Chain 9, working your way back up the chain - SC into second chain from hook and into next 3 stitches, HCD in next 2 stitches, DC in last 2 stitches, join to space where you started the chain (see picture)
Slip stitch into next stitch on the body, repeat from * for three more tentacles. Fasten off and leave tail for sewing onto granny square.


Labels: , , ,

Thursday, July 20, 2017

Kool-Aid Yarn Dying

This post may contain affiliate links. 

I just have to say right off the bat - my favorite thing about this yarn dying activity was that I did it with my son! It was easy and safe - no fumes/toxins and I didn't even have to use any hot appliances! All I needed was some yarn, kool-aid, water, a freezer, and a nice sunny day!

Dying yarn has been something I've wanted to do this year and I'm thrilled I finally got to be able to do it. I found this awesome tutorial in the winter months and I knew it was going to be a summer activity for my son and I. You can find that tutorial here: http://maiyamayhem.blogspot.com/2011/07/kool-aid-popsicle-dyeing.html
**She also has an additional post with tips so be sure to read both posts before you start!!**


My yarn didn't come out exactly the way I planned. I was anticipating a nice ombre effect but ended up with a tie dye effect, which in my perspective is still totally awesome! I'm really pleased with the results. I could've have added more kool-aid to completely cover the yarn in color, but like I said - the tie-dye is really unique and I think it will work up beautifully!


I worked up a small swatch to see how it would work up, and it looks amazing!! I plan on making my son a hat with this and if I have enough left over, maybe something for myself to match!

Notes for next time:


  • Use more kool-aid! I had 16 frozen ice cubes of kool-aid, but that wasn't enough for the 100grams of wool I had. After melting the cubes on the yarn, I had to add two more packets of kool-aid with about 6 ounces of water. As you can see, that still didn't cover the yarn. If you are dying with 100grams - definitely aim for AT LEAST two trays full of kool-aid cubes if not more.
After the ice cubes melted.

I flipped it and mixed it around a bit but the dye was already set into the wool. Lots of white left!

I mixed two additional packs of kool-aid, one of each color, and poured onto spots that I thought needed more color without saturating all of the yarn to keep some white and to keep that tie-dye effect.


  • Carefully place yarn when flipping and don't mix it up too much (like I did two pictures up). I had a bunch of tangles after I got my yarn out of the pan and it wasn't very fun to untangle the whole thing.
  • Don't stress! This was a really fun and easy project. I couldn't have messed it up if I tried! Although I didn't have enough kool-aid cubes and a lot of the yarn was white, I just mixed up some more kool-aid (didn't bother to freeze it) and poured it on the spots I thought it needed some color. No sweat! It still turned out great :)

I encourage everyone to try this method if you have ever wanted to dabble into yarn dying!

Pros:

  • Kool-aid is so cheap (about 25 cents a pack) and I only used 6 packs ($1.50 worth).
  • There's no fumes to worry about! With this method, nothing you use is toxic or hazardous (it actually smells delicious.) Join your kids on in the fun!
  • Using only the sun to help set the dye means no oven or stove-top needed! Another reason to get your kids to join in on the fun! Just set cover it in the sun and forget it for a little while! Covering the pan with plastic helps the yarn get nice and toasty (plus I noticed a lot of bugs were trying to get in on the sweet smelling yarn).


Cons:

  • This isn't really a con, but I had trouble finding a variety of different color kool-aids in my store. The one store I went to only had grape and fruit punch (purple and green) and the next store I went to additionally had a green apple (green). I was hoping to get some blue, but that will have to wait for next time!
  • This method can ONLY be used with natural fibers. No cotton or acrylic will work with this. Wool, alpaca, silk, ANY natural fiber will work with kool-aid. This is a bit of a con for me because I know there are many out there that aren't able to wear wool for allergy reasons. If I wear wool items for too long, my skin tends to get itchy - but that doesn't mean I can't get a little bit of wear about of them. ;)


Everything you need to know how to dye with kool-aid is in this tutorial: http://maiyamayhem.blogspot.com/2011/07/kool-aid-popsicle-dyeing.html
I purchased my bare yarn from Knit Picks at a good price. I chose a bulky weight so I could make my son a hat for the warmer months. They also have other weighted yarns to choose from that are ready to dye. I additionally purchased a worsted weighted yarn to dye later on.

This is the specific yarn I got pictured in this post: Bare Swish Bulky Yarn

You can browse all their bare yarns in different weights here.

Labels: ,

Wednesday, July 19, 2017

Crochet Whale Applique and Granny Square Free Crochet Pattern - Ocean Themed Blanket


OR SCROLL DOWN FOR THE FREE WHALE CROCHET PATTERN.


The Whale is the 13th square of my Ocean Afghan. To find all the information about this Afghan click here.

Say hello to the newest addition to the Ocean Afghan! A plump little whale! This guy can be made in many different colors - get creative! I was set on doing an orca whale, but the black did not translate well and the face really got lost so I ended up with a cute blue whale instead!


Only two more designs to go! I'm already joining them up and it's looking fantastic! Can't wait to share the whole afghan :)

PIN THIS TO YOUR CROCHET BOARD ON PINTEREST.

Materials:
Lion Brand Vanna’s Choice in Colonial Blue
Very small amount of worsted weighted black yarn
G hook
6mm safety eye (can be substituted by sewing on eye with black yarn)
Tapestry needle and scissors

Pattern:

Round 1: Magic Ring, 10 DC into ring, join to first DC
Round 2: Chain 2, 2DC in each stitch around, join to first DC
Round 3: Chain  1, *HDC, 2HDC, repeat from * around, join to first HDC
Round 4: Chain 1, SC, HDC, DC, turn your work
Round 5: Chain 1, SC in next 2 spaces, turn your work
Round 6: Chain 1, Sc in next 2 spaces, turn your work
Round 7: Chain 2, (DC, Chain 2, DC) all in one space, slip stitch into next space, (DC, Chain 2, DC, slip stitch) all in same space, fasten off.

Attach safety eye and sew on smile with black yarn and a tapestry needle.


Labels: , , ,

Saturday, July 15, 2017

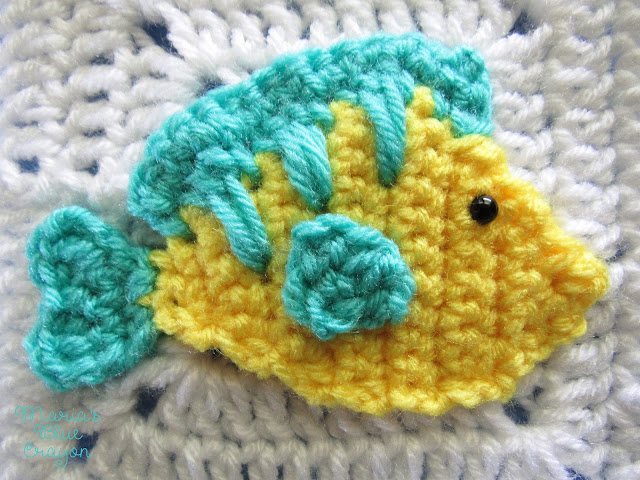
Crochet Tropical Fish Applique and Granny Square Free Crochet Pattern - Ocean Themed Blanket


The Tropical Fish is the 12th square of my Ocean Afghan. To find all the information about this Afghan click here.

This week I'm bringing you this adorable little tropical fish! Doesn't he remind you of Flounder from the Little Mermaid? I think he just might be my favorite of the bunch so far. I'm loving the color combination for this little guy! It's going to bring a lot of character to this afghan :)

My goal is to have this afghan done by the end of July! Three more designs to go and I'm already starting to join the squares! So stoked.


PIN THIS TO YOUR CROCHET BOARD ON PINTEREST.

Materials:
Lion Brand Vanna’s Choice in Aquamarine
Worsted weight yarn in yellow
G hook
6mm Safety eye (can be substituted by sewing eye on with black yarn)
Tapestry needle and Scissors

Amazon Picks (affiliate):


Notes:
SC2tog: Insert hook through first stitch, pull up a loop, insert hook through second stitch, pull up a loop, YO, pull through all loops on hook

SC3tog: Insert hook through first stitch, pull up a loop, insert hook through second stitch, pull up a loop, insert hook through third stitch, pull up a loop, YO, pull through all loops on hook

Pattern:

Starting with yellow yarn

Row 1: Chain 2, SC in second chain from hook and next space, turn
Row 2: Chain 1, 2SC in each stitch across, turn
Row 3: Chain 1, 2SC, SC in next 2 stitches, 2SC, turn
Row 4: Chain 1, SC across, turn
Row 5: Chain 1, 2SC, SC in next 4 stitches, 2SC, turn
Row 6: Chain 1, 2SC, SC in next 6 stitches, 2SC, turn
Row 7: Chain 1, 2SC, SC in next 9 stitches, turn
Row 8: Chain 1, SC across, turn
Row 9: Chain 1, SC2tog, SC in next 9 stitches, turn
Row 10: Chain 1, SC in next 8 stitches, SC2tog, turn
Row 11: Chain 1, SC2tog, SC in next 7 stitches, turn
Row 12: Chain 1, SC2tog, SC in next 4, SC2tog, turn
Row 13: Chain 1, SC2tog, SC in next 2 stitches, SC2tog, turn
Row 14: Chain 1, SC2tog, SC2tog, turn
Row 15: Chain 1, [SC, slip stitch] into same space, SC, fasten off

Using Aquamarine, attach to Row 1 of the body to start the tail

Chain 1, 2SC in each stitch across, turn
Chain 1, SC across, turn
Chain 2, 2DC, SC in next 2 stitches, 2DC, slip stitch into same space as last DC, fasten off

Top fin - use aquamarine

Attach  on the side of Row 10 on the top of the body (start counting the rows from the tail - the tail of the fish will be pointing to the left)

Chain 1, SC in next 3 stitches, 2DC 4 spaces down from the last SC, *SC in next 2 stitches, 2DC 4 spaces down from the last SC, repeat from * one more time, turn
Chain 1, SC across until you get to second to last stitch, fasten off

Side fin - use aquamarine - will be made separately then sewn onto the body
Chain 2, SC across, turn
Chain 1, SC3tog, fasten off and sew onto body

Find the pattern for the granny square here.


Labels: , , ,

Thursday, July 13, 2017

Crochet Puffer Fish Applique and Granny Square Free Crochet Pattern - Ocean Themed Blanket


OR SCROLL DOWN FOR THE FREE PUFFER FISH CROCHET PATTERN.


The Puffer Fish is the 11th square of the crochet Ocean Themed Blanket. Find all the information about this granny square blanket here.

I've officially resorted to emoji's for my ideas, which isn't a bad thing! I love how unique this puffer fish is and it adds some neutral to this colorful afghan.

I'm getting so close to finishing, I just can't contain my excitement! Eeee!!! I have laid down my squares and have a good idea of where I am going to place all the ocean critters.

I am joining with an invisible seam, but you can join however you prefer. This is my first time doing the invisible join so I'm crossing my fingers everything turns out well! I have used single crochets to join my Woodland Afghan because I think it's quick and easy! If you would like to join with single crochets, I put together a small tutorial on how to do that here.


PIN THIS TO YOUR CROCHET BOARD ON PINTEREST.

Materials:
Loops&Threads Impecable in Soft Taupe
Lion Brand Vanna's Choice in Taupe, Mustard, a tiny bit of black
G hook
6mm safety eye
Tapestry needle
Scissors

Amazon Picks (affiliate links):


Note: It's not always favorable to mix yarns but I used what I had on hand, hence mixing the lion brand and loops&threads yarn.  For this project, I think it turned out fine.

Spikes on the body are sewn on with a running stitch using a tapestry needle.

Picot: SC, chain 2, SC all in one stitch

Pattern:

Body - G hook - Soft Taupe and Taupe
Starting with Soft Taupe
Round 1: Magic Ring, Chain 1, 10 HDC in ring, join to first HDC
Round 2: Chain 1, 2HDC in each stitch around, join to first HDC
Round 3: Chain 1, *2HDC, HDC, repeat from * around, join to first HDC
change yarn to Taupe color
Round 4: Chain 1, *picot (see notes), slip stitch in next 2 spaces, repeat from * around until you have three stitches left, fasten off

Using tapestry needle and Taupe colored yarn, sew on spikes on the body (upside down V's around the circle). Position the circle so the spike gap is facing the right. Between that gap will be the face, do not sew a spike on that side.

Tail - G hook - Mustard

Attach yarn to slip stitch between the 5th and 6th spikes (count from the top of the head and around).
Row 1: Chain 1, SC in same space and next space, turn your work
Row 2: Chain 1, 2SC in each stitch, turn your work
Row 3: Chain 1, SC across, fasten off

Fin - G hook - Mustard
This is made separately then sewed onto the body with a tapestry needle.

Row 1: Chain 3, SC in second chain from hook and next stitch, turn
Row 2: Chain 1, SC2tog, fasten off

Face

Attach safety eye (can substitute by sewing on with black yarn) and sew on mouth with a small amount of black yarn.

Labels: , , ,

Sunday, July 9, 2017

Crochet Shark Applique and Granny Square Free Crochet Pattern - Ocean Themed Blanket


OR SCROLL DOWN FOR THE FREE SHARK CROCHET PATTERN.

The Shark is the 10th square of my Ocean Afghan. To find all the information about this Afghan click here.

Shark week is coming up on Discovery channel in a few weeks, so I just had to design a shark for the Ocean Afghan! Do you guys watch Shark week? I'm not by any means a die-hard fan or watch it religiously, but I do enjoy watching some of the segments they put up for the week!

So I officially have 2/3 of the designed squares done!! It's the final stretch!! I do have a good idea of what the last 5 squares will be, so I'm hoping they will all work out. If you are a designer or create things on your own, you know that things don't always come out as planned. Several of these squares so far I have reworked and reworked, and some I even had to change my vision for because they just weren't panning out the way I thought.


For this shark, I'm not too thrilled with the colors I chose. The underbelly is white so it didn't show up very well on the white square. You can try using a darker gray for the body and a light gray for the underbelly if you would like it to pop out more on the square. Perhaps even a dark blue and light blue under belly would work well. Share with me on Facebook or Instagram! I'd love to see what you come up with :)

PIN IT TO YOUR CROCHET BOARD ON PINTEREST.

Materials:
Lion Brand Vanna’s Choice in Silver Heather (gray), White, Black
6 mm safety eye
G hook
Tapestry needle
Scissors

Amazon Picks (affiliate links):


Notes:
SC2TOG: single crochet decrease/“single crochet two together”

Pattern:
Body

Using the gray,
Row 1: Chain 2, SC into second chain from hook, turn
Row 2: Chain 1, 2SC, turn
Row 3: Chain 1, 2SC in next two stitches, turn
Row 4: Chain 1, SC across, turn
Row 5: Chain 1, 2SC, SC in next 2 stitches, 2SC, turn
Row 6-13: Chain 1, SC across, turn
Row 14: Chain 1, sc2tog, sc in next 2, sc2tog, turn
Row 15-16: Chain 1, SC across, turn
Row 17: Chain 1, sc2tog, sc2tog, turn
Row 18: Chain 1, SC across, turn
Row 19: Chain 2, [2dc, chain 3, 2dc] all in first space, slip stitch to second stitch then work the following in that same stitch [chain 2, 2dc, chain 3, 2dc, slip stitch] fasten off

The “right side” of the shark will be with the tail on the left and the face on the right.

Top fin

Attach gray yarn about 8 stitches back from the head
Chain 1, SC in next 3 stitches, turn
Chain 2, sc2tog, fasten off

Side fin (make separate then sew on)
Using gray yarn
Chain 3, SC in second chain from hook and in next stitch, turn
Chain 1, SC across, turn
Chain 1, sc2tog, fasten off and leave tail for sewing

Underbelly
Using white yarn
Attach white yarn about 3 stitches away from the tail
Chain 1, SC across until there are 2 stitches left. Slip stitch and fasten off.

Attach eye between rows 4&5 or use black yarn to sew on eye
Sew on gills and mouth using black yarn and a tapestry needle

Labels: , , ,

Thursday, July 6, 2017

Crochet Seashell Applique and Granny Square Free Crochet Pattern - Ocean Themed Blanket


OR SCROLL DOWN FOR THE FREE SEASHELL CROCHET PATTERN.

The Seashell is the 9th square of my Ocean Afghan. To find all the information about this Afghan click here.

You can't have an Ocean theme without a pretty seashell! This 9th square is so pretty and will be my last one that I use so much pink on. ;) I love this shade of pink from Lion Brand Vanna's Choice - it gives a delicate sheen to it and is just so pretty!

PIN IT TO YOUR CROCHET BOARD PINTEREST.

Materials:
Lion Brand Vanna's Choice in Pink and White
G hook
Tapestry needle
Scissors

Amazon Picks (affiliate links)


Notes:
TR - treble crochet/triple crochet in US terms


Pattern:

Row 1: Chain 6, SC into second chain from hook and in the remaining stitches, turn (5)
Row 2: Chain 1, SC decrease, SC, SC decrease, turn (3)
Row 3: Chain 1, SC across, turn (3)
Row 4: Chain 1, 2SC, SC, 2SC, turn (5)
Row 5: Chain1, 2SC, SC into next 3 stitches, 2SC, turn (7)
Row 6: Chain 1, 2SC, SC into next 5 stitches, 2SC, turn (9)
Row 7: Chain 1, 2SC, SC into next 7 stitches, 2SC, turn (11)
Row 8: Chain 1, 2SC, SC into next 9 stitches, 2SC, turn (13)
Row 9-10: Chain 1, SC across (13)
Row 11: Chain 1, 2SC, SC into next 11 stitches, 2SC, turn (15)
Row 12: Chain 1, SC into next 3 stitches, HDC into next 3 stitches, DC into next 3 stitches, HDC into next 3 stitches, SC into next 3 stitches, turn
Chain 13: Chain 1, skip first stitch, 5HDC (all in one stitch), slip stitch, skip stitch, 5 DC(all in one stitch), slip stitch, skip stitch, 5TR (all in one stitch), slip stitch, skip stitch, 5 DC (all in one stitch), slip stitch, skip stitch, 5 HDC (all in one stitch), slip stitch, fasten off.

Using white yarn and tapestry needle, sew on details. You can also use the surface crochet method if preferred. I used the backstitch to sew on the details with a tapestry needle. (A quick youtube or google search will be able to show you this method of sewing if you're not familiar with this technique).

Enjoy your pretty seashell! You can find the granny square pattern here.

Labels: , , ,

Wednesday, July 5, 2017

Sunburst Granny Square Crochet Pattern


Have you ever started a big project and lost steam or interest? Ever worked on a granny square blanket and kept wondering "how much longer?"

Not with these squares! I'm telling you guys, this project is my favorite ever, and I have not gotten sick of working on this project even for a second. I'm the queen of WIPs because I get bored with projects. This one? Heck no! This is my go to project for months now and I always enjoy working on it.

If you're following me on Instagram, you have surely seen these gorgeous granny squares littering my feed. They're so colorful and simple at the same time.

Each square is so vibrant, unique, and somehow still screams simplicity! I've since become a fan of circle grannies since I made my Woodland Afghan, and have come up with a smaller sized granny square to show case each little pop of color in the middle.


How am I making each and every square so completely unique? The secret to these babies are really in the yarn. I initially picked up this Yarn Bee Glowing in Purple-Multi at Hobby Lobby for my amigurumi unicorn pattern (you can check that out here). I had lots of yarn left to play with and I knew I wanted to use it with a solid white to give it good contrast. Out came these granny squares and I haven't stopped since! Literally. I am still making these squares between other projects in order to make it into an afghan.


A few things I love about these granny squares:

Each square is totally different and making each granny square is like magic. First you start with the circle where each and every circle is packed with beautiful color and no two are alike. Then you add the white and somehow it totally transforms into something more beautiful!

They're small and easy to work on anywhere. Even outside in the dead of summer. Granny squares in general are great to work on in the warmer months because they're so small and you never have anything draped over your lap.

And the best thing? They're so stinkin' easy and quick! I make the circles in bulk and then I work on the white boarder to make them in a square. In total, there are only 4 rounds.


Since I know there will be hundreds of these babies, I am also weaving in the ends in batches. I do not want to save them for the end! 

***Please note, I have not finished this afghan yet so I can't tell you how much yarn to buy/use. I'm not even set on the size I will be making this afghan yet. But I can help you out with this: Each square is about 4 inches x 4 inches. I will come back and edit the details once this project is finished and I know how much yarn/yardage I have used!***

Materials:
Yarn Bee Glowing in Purple Multi
White worsted weight yarn
(I am using Loops&Threads Impeccable from Michaels)
H hook
Tapestry needle and scissors

Notes:
Gauge- Each square I have made is 4inches x 4 inches.
I tend to crochet fairly loose, you may need to go up a hook size.

If you don't have access to a Hobby Lobby to purchase the Yarn Bee, look around at your craft stores for other variegated yarns!

Pattern: *Scroll down for the video tutorial*

Using the variegated yarn:

Round 1: Magic Ring, Chain 2, 10 DC into ring, join to first DC

Round 2:Chain 2, 2DC in each stitch around, join to first DC

-change color to white, after making the circle you may need to stretch it out a bit with your hands
Round 3: (with white yarn) Chain 2, DC in same space, HDC, HDC, DC, [2DC, chain 2, 2DC] all in next space, *DC, HDC, HDC, DC, [2DC, chain 2, 2 DC] all in next space, repeat from * two more times, join to first DC

Round 4: Chain 2, *DC until you get to chain 2 space from previous round. [DC, chain 2, DC] into chain 2 space from previous round. Repeat from * three more times. DC in next two spaces, join to first DC or the round. Fasten off.

You may want to block your granny squares to get them stretched out and flat before you join all the squares together. If you don't have a blocking board, you can use kids foam mats (the interlocking puzzle piece mats), a garden knee cushion, or anything you can stick a few skewers into. All you will need to do is have 4 skewers or small dowels and insert them into what ever you are using as the base and slide on the granny squares. 


Keep this pattern handy by saving to your Pinterest boards!

Labels: , , ,

Sunday, July 2, 2017

Crochet Stingray Applique and Granny Square Free Crochet Pattern - Ocean Themed Blanket


OR SCROLL DOWN FOR THE FREE STINGRAY CROCHET PATTERN.


The Stingray is the 8th square of my Ocean Afghan. To find all the information about this Afghan click here.

Say hello to my 8th granny square design - a stingray! I got my inspiration from Finding Nemo's Mr. Ray.  I love the spotted look of Mr. Ray and I wanted to incorporate that into this design!

I think he's very simple but will make a great addition to the other ocean friends I have currently designed.

This 8th squares puts me past the half-way mark *happy dance* and I "only" have 7 more to go!


I'm thrilled to be past the half way mark and every time I lay down my squares, I feel a sense of satisfaction. This afghan is coming together so beautifully with all the colors and I can't wait to have it all pieced together!

PIN TO YOUR CROCHET BOARD ON PINTEREST.

Materials
Lion Brand Vanna’s Choice in Navy and Silver Blue
G hook
6mm safety eyes (optional)
Tapestry needle
Scissors

Amazon Picks (affiliate):


Notes:
Foundation single crochet technique will be used in this pattern for the tail.

YO = yarn over

6mm safety eyes are used, but can be substituted with french knots in black yarn.

Pattern

Row 1: Chain 3, SC across, turn (2)
Row 2: Chain 1, 2SC in each stitch across, turn (4)
Row 3: Chain 1, 2SC, SC, SC, 2SC, turn (6)
Row 4: Chain 1, 2SC in each stitch across, turn (12)
Row 5: Chain 1, Sc across, turn (12)
Row 6: Chain 1, 2SC, SC in next 10 stitches, 2SC, turn (14)
Row 7: Chain 1, Sc across, turn (14)
Row 8: Chain 1, slip stitch into next 5 stitches, Chain 2, DC into next 4 stitches, slip stitch into the last 5 stitches, fasten off

Tail/Spots

Attach navy yarn to Row 1, chain up 1, insert hook into next space, pull up a loop, YO, pull through one loop, YO, pull through both loops. That completes one foundation single crochet. Continue to foundation single crochet 4 more times. Fasten off.

Using a tapestry needle and silver blue yarn, sew on spots on the body.

Labels: , , ,