Add next in . Do NOT use www. for the new_domain Maria's Blue Crayon: December 2017

Sunday, December 31, 2017

Faux Knit Ear Warmer - Free Crochet Pattern

Get the free pattern & PDF printable/download for this faux knit ear warmer crochet pattern below! 


Happy 2018! I'm so happy to start this year with lots of new design ideas and big goals! 

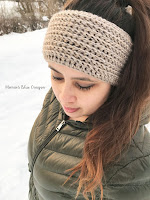
To start off, I'm sharing with you a crochet ear warmer pattern that looks knit! I've been crushing on knitted items lately - the look and the texture! I learned how to knit last year and I fell in love with how stretchy and flexible the stitches are.

This crocheted headband gives you the knit look as well as the stretchy feel to keep your ears extra snug and cozy. I made it a bit wider than previous ear warmers I've made so I don't have to fiddle around much when wearing them.


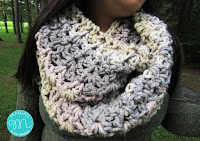
This ear warmer is pretty darn similar to my Aspen Infinity Scarf. It uses the same stitches and has the same texture to match this.. aaaand I used the left over yarn from that scarf so it's basically a perfect match. If you'd like to make a ear warmer/scarf set, you can find the Aspen Infinity Scarf pattern here for free.


I used Lion Brand's Heartland yarn for this and honestly, it's my favorite acrylic yarn. I tend to get very itchy when wearing wool (especially anything that goes on my head) so I'm super pleased with how soft the Heartland yarn is and the color choices are fantastic!

You will be able to make at least two ear warmers with one skein of the Heartland yarn - make yourself one and make another for your favorite pal! Or donate one to charity! 

Also, as a big thank you for such a great and successful start to my blog in 2017, the PDF printable version on Ravelry will be free for everyone to download! Running my crochet blog wouldn't be possible without your likes, comments, shares, pattern purchases, visiting my site, and all around support! Thank you!


Pattern

Materials
Lion Brand Heartland yarn (Grand Canyon)
H/5.00mm hook
Tapestry needle
Scissors

Pattern Notes

The chainless foundation is necessary for maximum stretchiness.

To make the ear warmer larger/smaller, increase/decrease the beginning number of stitches.

Ear warmer will be made in rounds, add more or make less rows to make the ear warmer thicker or skinnier.

Gauge: 4" x 4" ~ 7 st x 6 rows in front post double crochet

Click here to read how to check your gauge and why it may be important.

Abbreviations (US terms)
Ch = chain, sc = single crochet, dc = double crochet, fpdc = front post double crochet

Round 1: Make 60 chainless foundation sc, join to first sc (use the tail to sew the bottom of the stitches together)
Round 2: Ch 2, dc around, join to first dc
Round 3-11: Ch 2, fpdc around, join to first dc
Round 12: Ch 1, sc around, join to first sc
Fasten off and weave in all ends.

Flip inside out so the horizontal texture is facing outward.


Labels: , ,

Wednesday, December 27, 2017

Meet the Maker with Allison of Melon Girl Knits

Here on the blog today, I'm continuing with my Meet the Maker Series and I'm really excited about today's maker!


Allison of Melon Girl Knits is a down to earth, super talented, and inspirational knitter and crocheter. Being home schooled, she is allowed the time of building her handmade business and aspires to continue to grow her business.

Follow Allison on Instagram and check out her Etsy - she has gorgeous crochet, knit, and macrame items! She even has a handful of beautiful and unique crochet patterns!

In the interview I had with Allison, she talks about how she makes time for her handmade business and gives a few tips on setting up for craft shows! Read on for the full interview.


How long have you been crocheting and knitting?

I’ve been crocheting for about 5 years and knitting for 2.


What are you favorite yarns and tools (hooks/needles)?

My absolute favorite crochet hooks are Amour hooks by Clover. I used to use Boye crochet hooks which worked great, but once I got my hands on a Clover hook that was it! For knitting needles I really like the wood bamboo needles by Clover. But they have to be the circular ones because I usually loose one of the needles when using straight needles.


What made you decide to start selling your items?

The first time I had the thought about selling my items was when I was 14, but I pushed that thought aside saying I was a little to young and my crochet hats and scarves were a little to wonky (which was probably true). Over the next couple years I went back and forth on whether I should sell my items, but I think the real game changer and what really pushed me over the edge was when my Mom told me to just go for it. And she said “if it doesn’t work out you will only being loosing a little bit of money”. That’s when I decided to sell my items and to just go for it!


Can you offer any tips on setting up for a craft show?

I am by no means an expert on craft shows or know everything there is to know, but here is what I have learned that I really wished I knew when I started out.

The first thing I would say is to have different variations of height on your table. I recommend not laying all of your work flat on the table, it’s simply not appealing and people are less likely to walk up to your table/ booth.

The second thing I would say is do NOT place all of your stock on your table. It tends to make the table look cluttered and disorganized. Instead have the extras handy under your table to restock when things get low. Now you may be thinking but I have to put every style and every color I have out there. The first would be right, put every style you have out there but not every color. If people really like an item and don’t see a color they really like they will ask you if you have others.

The third would be to have some sort of help when setting up and tearing down your set up. I know this can be extremely hard if you are a one person show but it will really help you be less stressed and be happier when the show is actually going.
The last thing I would say is have some mannequins to display your items (if you sell hats or scarfs), a mirror so people can see the item they are trying on, and of course a table cloth.


How do you make time for your small business and school work?

Well for starters I’m home schooled, which helps immensely. And to give you all a little bit of background my teachers (AKA my parents) have always believed in letting kids be kids and simply letting them play instead of giving them hours of school work. So growing up I had  maybe 2 or 3 hours of school work a day, which allowed me to have the rest of the day to pursue my creative endeavors. Today I may have a little bit more school then when I was 10, but I still have an awesome amount of time to have a job, run a small business, and do school work.


Is being a maker what you would like to do full time in the future or do you have other plans?  

I would love to become a full time maker down the road and have my business be the thing that supports me, but I also really want to continue with the two jobs I have…. So I guess I’m contradicting what I just said… Either way, I really want to grow my business and really take It as far as I can.


Isn't she inspiring?! Starting something you love at a young age is pretty fantastic, if you ask me. And she's totally rocking it! Be sure to follow her on Instagram and Facebook. Also check out her Etsy to see more of her items!

To read about more makers, you can check out the main Meet the Maker Series post here to read other interviews with awesome makers!

Labels: ,

Tuesday, December 26, 2017

Crochet Bloggers Top Free Crochet Patterns of 2017


What a year 2017 was for crochet! (Especially for me!) This was my first year blogging and I've learned so much and have created so many things that I hold near and dear to me.

I've teamed up with other talented bloggers to share with you our top patterns of the 2017! Scroll through to check out all the talented bloggers and see what came out as my top pattern this year!

The Friendly Red Fox's top post is this Friendly Mermaid! This is a great free pattern for someone who wants to try a doll because it is very beginner friendly. Make sure you sign up for The Friendly Newsletter and join The Friendly Crochet Club if you want to keep following along for more free patterns and tip!

Make and Do Crew had this Easy, Chunky Crochet Sweater come in at number one! Such an awesome (and easy!) sweater! There is even a video tutorial. Follow her on Instagram here.

Beautiful cardigans must have been a theme because Sewrella's top post was this Everyday Cardigan! So pretty and a great staple piece! Follow her on Pinterest here.

 Maria's Blue Crayon made this adorable Woodland Granny Square Afghan and it is no surprise that it came in first. Look at how cute! Follow her on Facebook here.

 Left in Knots came up with this brilliant idea for Crochet Water Balloons! Such a cute idea! Follow her on  Facebook for more fun!

Little Monkey's Crochet has sweet little Henry's Baby Blanket as her top post! She has so many other cute patterns, too! Make sure to follow her over on Facebook!

One Dog Woof has this sweet amigurumi Classic Stuffed Bunny as her top post. So easy to see why! Follow her on Instagram to keep up with her projects!


Persia Lou crafts all the things but has some super adorable crochet projects! These adorable pom pom slippers were her top post this year! Follow her on Pinterest.

Whistle and Ivy's top post is this super amazing, very versatile Crochet Snowfall hat! I have seen A LOT of these in the crochet groups I am in! Be sure to join Whistle and Ivy's group here.

All About Ami made these adorable Snuggle Bunny Pillows and it is no wonder that is her top post for 2017! Make sure you follow along on Instagram!

Labels:

Monday, December 18, 2017

Last Minute Christmas Gifts to Crochet - Free Crochet Patterns

Are you looking for a last minute Christmas gifts to crochet?

I got your back. I've rounded up all of my quick and easy free crochet patterns for you to choose from!

1. Simple Crochet Ear Warmers Crochet Pattern

Quick and easy ear warmer free crochet pattern

These ear warmers are so quick and easy - they're also beginner friendly. Whip out as many as you need, they won't take you long!


2. Crochet Infinity Scarf with One Sprinkle Caron Cake Crochet Pattern

Quick and easy crochet infinity scarf free crochet pattern

Chunky yarn. One skein. Need I say more? Get to it!


3. Basic Infinity Scarf Crochet Pattern

Quick and easy chunky infinity scarf free crochet pattern

This scarf uses up about 2 skeins of yarn, but it's ALL double crochet. If you're quick, you can easily whip this up in 2 hours tops.


4. Basic Chunky Beanie Crochet Pattern

Quick and easy chunky crochet beanie with pom pom free crochet pattern

A super duper quick hat! All double crochet and some front and back post double crochets for the brim. Slap on a pom pom (or not) and you got yourself a nice handmade gift!


5. Quick and Easy Chunky Cowl Crochet Pattern

Quick and easy chunky cowl free crochet pattern

Get ready for a lot of squish - this cowl is so comfy and cozy! I only used a little more than half a skein of Caron Tea Cakes for this one!


6. Quick Chunky Beanie W/ Messy Bun Version Crochet Pattern

Quick and easy chunky crochet beanie with pom pom free crochet pattern

This messy bun hat is made with bulky yarn, which is why it's so quick to crochet! 


7. Double Sided Scrubbies Crochet Pattern

Quick and easy kitchen scrubbies free crochet pattern

Looking for a nice stocking stuffer or small gift that prefers non-wearables? These scrubbies are great for the kitchen and the bath!


8. Faux Knit Ear Warmer Crochet Pattern

Quick and easy faux knit ear warmer free crochet pattern

I love to knit, but sometimes crocheting is just faster! I love the texture this crochet ear warmer has and it's nice and thick to keep you warm! It would make a great stocking stuffer or last minute gift. Free Crochet Pattern here.

If you're a quick crocheter and have more than an hour or so to make last minute gifts check out the scarves, hat, and garment patterns I have!


Garment Patterns

Want more quick and easy free crochet patterns?

Click here for a few more I have rounded up previously.

Labels: ,

Wednesday, December 13, 2017

Pizza Hat - Toddler, Child, Adult Sizes - Free Crochet Pattern

Make this fun toddler sized crochet pizza hat with the free pattern below!


In the middle of Fall, I asked my son what kind of hat he wanted me to make him. He said "Pizza hat!" I thought it was the most genius and funniest idea, so I made it come to life for him!

This hat is so much fun and I love all the pepperonis on it! On the contrary, my son prefers plain pizza only, but I had to add something to the pizza! Plus, pepperonis are such a classic topping. :)


I made the brim stretchy for a good fit, and the main portion of the pizza kind of resembles an elf hat - but it's pizza! So cute!

I made enough pepperonis to fill up one side of the pizza and even wrapped one around the hat, so it looks like half of a pepperoni. :) You can make as many pepperonis you would like - or even add some more toppings!

Grab your hooks and get ready to make this for a pizza loving toddler!

PIN it to your boards here.

Save it to your Ravelry for later.

Pattern

Materials:
Worsted weight yarn in light taupe, beige, and red
J/6.00mm hook
H/5.00mm hook
Tapestry needle
Scissors

Pattern notes:

The hat will be made starting from the brim and ending at the top/point.

“Pepperonis” will be made separately and sewn onto the hat on one side.

Decreases in the pattern will be double crochet decreases and worked as follows: YO, insert hook in one st, pull up a loop, YO, pull through 2 loops, YO, insert hook in 2nd st, pull up a loop, YO, pull through all loops on hook

Gauge: 4" x 4" ~ 12 stitches x 7 rows in double crochet

Abbreviations (US terms)
Ch = chain, dc = double crochet, fpdc = front post double crochet, bpdc = back post double crochet, dec = decrease, yo = yarn over

Toddler (18” circumference)

Start with Taupe color and J/6.00mm hook

Round 1: Ch 50, join to first ch
Round 2: Ch 2, dc around, join to first dc
Round 3: Ch 2, *fpdc, bpdc, repeat from * around, join to first dc
Round 4-5: Repeat Round 3

Switch to beige color

Round 6-10: Ch 2, dc around, join to first dc
Round 11: Ch 2 *dc in next 23 st, dec, repeat from *, join to first dc
Round 12: Ch 2 *dc in next 22 st, dec, repeat from *, join to first dc
Round 13: Ch 2 *dc in next 21 st, dec, repeat from *, join to first dc
Round 14: Ch 2 *dc in next 20 st, dec, repeat from *, join to first dc
Round 15: Ch 2 *dc in next 19 st, dec, repeat from *, join to first dc
Round 16: Ch 2 *dc in next 18 st, dec, repeat from *, join to first dc
Round 17: Ch 2 *dc in next 17 st, dec, repeat from *, join to first dc
Round 18: Ch 2 *dc in next 16 st, dec, repeat from *, join to first dc
Round 19: Ch 2 *dc in next 15 st, dec, repeat from *, join to first dc
Round 20: Ch 2 *dc in next 14 st, dec, repeat from *, join to first dc
Round 21: Ch 2 *dc in next 13 st, dec, repeat from *, join to first dc
Round 22: Ch 2 *dc in next 12 st, dec, repeat from *, join to first dc
Round 23: Ch 2 *dc in next 11 st, dec, repeat from *, join to first dc
Round 24: Ch 2 *dc in next 10 st, dec, repeat from *, join to first dc
Round 25: Ch 2 *dc in next 9 st, dec, repeat from *, join to first dc
Round 26: Ch 2 *dc in next 8 st, dec, repeat from *, join to first dc
Round 27: Ch 2 *dc in next 7 st, dec, repeat from *, join to first dc
Round 28: Ch 2 *dc in next 6 st, dec, repeat from *, join to first dc
Round 29: Ch 2 *dc in next 5 st, dec, repeat from *, join to first dc
Round 30: Ch 2 *dc in next 4 st, dec, repeat from *, join to first dc
Round 31: Ch 2 *dc in next 3 st, dec, repeat from *, join to first dc
Round 32: Ch 2 *dc in next 2 st, dec, repeat from *, join to first dc
Fasten off. Using tapestry needle, close up hole.

Child (20” circumference) 

Start with Taupe color and J/6.00mm hook

Round 1: Ch 56, join to first ch
Round 2: Ch 2, dc around, join to first dc
Round 3: Ch 2, *fpdc, bpdc, repeat from * around, join to first dc
Round 4-5: Repeat Round 3

Switch to beige color

Round 6-13: Ch 2, dc around, join to first dc
Round 14: Ch 2 *dc in next 26 st, dec, repeat from *, join to first dc
Round 15: Ch 2 *dc in next 25 st, dec, repeat from *, join to first dc
Round 16: Ch 2 *dc in next 24 st, dec, repeat from *, join to first dc
Round 17: Ch 2 *dc in next 23 st, dec, repeat from *, join to first dc
Round 18: Ch 2 *dc in next 22 st, dec, repeat from *, join to first dc
Round 19: Ch 2 *dc in next 21 st, dec, repeat from *, join to first dc
Round 20: Ch 2 *dc in next 20 st, dec, repeat from *, join to first dc
Round 21: Ch 2 *dc in next 19 st, dec, repeat from *, join to first dc
Round 22: Ch 2 *dc in next 18 st, dec, repeat from *, join to first dc
Round 23: Ch 2 *dc in next 17 st, dec, repeat from *, join to first dc
Round 24: Ch 2 *dc in next 16 st, dec, repeat from *, join to first dc
Round 25: Ch 2 *dc in next 15 st, dec, repeat from *, join to first dc
Round 26: Ch 2 *dc in next 14 st, dec, repeat from *, join to first dc
Round 27: Ch 2 *dc in next 13 st, dec, repeat from *, join to first dc
Round 28: Ch 2 *dc in next 12 st, dec, repeat from *, join to first dc
Round 29: Ch 2 *dc in next 11 st, dec, repeat from *, join to first dc
Round 30: Ch 2 *dc in next 10 st, dec, repeat from *, join to first dc
Round 31: Ch 2 *dc in next 9 st, dec, repeat from *, join to first dc
Round 32: Ch 2 *dc in next 8 st, dec, repeat from *, join to first dc
Round 33: Ch 2 *dc in next 7 st, dec, repeat from *, join to first dc
Round 34: Ch 2 *dc in next 6 st, dec, repeat from *, join to first dc
Round 35: Ch 2 *dc in next 5 st, dec, repeat from *, join to first dc
Round 36: Ch 2 *dc in next 4 st, dec, repeat from *, join to first dc
Round 37: Ch 2 *dc in next 3 st, dec, repeat from *, join to first dc
Round 38: Ch 2 *dc in next 2 st, dec, repeat from *, join to first dc
Fasten off. Using tapestry needle, close up hole.

Adult (21” circumference)

Start with Taupe color and J/6.00mm hook

Round 1: Ch 60, join to first ch
Round 2: Ch 2, dc around, join to first dc
Round 3: Ch 2, *fpdc, bpdc, repeat from * around, join to first dc
Round 4-5: Repeat Round 3

Switch to beige color

Round 6-15: Ch 2, dc around, join to first dc
Round 16: Ch 2 *dc in next 28 st, dec, repeat from *, join to first dc
Round 17: Ch 2 *dc in next 27 st, dec, repeat from *, join to first dc
Round 18: Ch 2 *dc in next 26 st, dec, repeat from *, join to first dc
Round 19: Ch 2 *dc in next 25 st, dec, repeat from *, join to first dc
Round 20: Ch 2 *dc in next 24 st, dec, repeat from *, join to first dc
Round 21: Ch 2 *dc in next 23 st, dec, repeat from *, join to first dc
Round 22: Ch 2 *dc in next 22 st, dec, repeat from *, join to first dc
Round 23: Ch 2 *dc in next 21 st, dec, repeat from *, join to first dc
Round 24: Ch 2 *dc in next 20 st, dec, repeat from *, join to first dc
Round 25: Ch 2 *dc in next 19 st, dec, repeat from *, join to first dc
Round 26: Ch 2 *dc in next 18 st, dec, repeat from *, join to first dc
Round 27: Ch 2 *dc in next 17 st, dec, repeat from *, join to first dc
Round 28: Ch 2 *dc in next 16 st, dec, repeat from *, join to first dc
Round 29: Ch 2 *dc in next 15 st, dec, repeat from *, join to first dc
Round 30: Ch 2 *dc in next 14 st, dec, repeat from *, join to first dc
Round 31: Ch 2 *dc in next 13 st, dec, repeat from *, join to first dc
Round 32: Ch 2 *dc in next 12 st, dec, repeat from *, join to first dc
Round 33: Ch 2 *dc in next 11 st, dec, repeat from *, join to first dc
Round 34: Ch 2 *dc in next 10 st, dec, repeat from *, join to first dc
Round 35: Ch 2 *dc in next 9 st, dec, repeat from *, join to first dc
Round 36: Ch 2 *dc in next 8 st, dec, repeat from *, join to first dc
Round 37: Ch 2 *dc in next 7 st, dec, repeat from *, join to first dc
Round 38: Ch 2 *dc in next 6 st, dec, repeat from *, join to first dc
Round 39: Ch 2 *dc in next 5 st, dec, repeat from *, join to first dc
Round 40: Ch 2 *dc in next 4 st, dec, repeat from *, join to first dc
Round 41: Ch 2 *dc in next 3 st, dec, repeat from *, join to first dc
Round 42: Ch 2 *dc in next 2 st, dec, repeat from *, join to first dc
Fasten off. Using tapestry needle, close up hole.

Pepperonis

Using red and H/5.00mm hook

Round 1: Make a magic ring, ch 2, 12 dc in ring, join to first dc
Round 2: Ch 2, 2hdc in each stitch around, join to first hdc
Fasten off, leave tail for sewing onto hat

Make at least 5 to sew onto hat.

Labels: ,

Sunday, December 10, 2017

Snowden Beanie - Free Crochet Pattern

Find the free pattern for this crochet beanie down below or purchase the PDF ad-free printable version here.

Before I started designing this beanie, I set out to make something that would resemble a knitted brim. I love the way a knitted brim looks!

Also, because my sister sent me a photo of some knitted beanies from a chain store and I thought - I could crochet that and it will look even better. (And in my opinion, it looks pretty dang good and will most likely last a lot longer!)


First, I made the faux knit brim, then I alternated front post and back post double crochets to create a seed stitch look. I think it turned out pretty well! Are there any knitters out there? What do you think - does it look knitted?

Overall, I'm 100% stoked about the outcome! It has so much beautiful texture and it's so stylish with that faux fur pom pom!

I used Lion Brand Heartland yarn because I wanted to use a soft, worsted weight yarn that wouldn't make the beanie too stiff. I used the back post and front post double crochet stitches and that can get pretty rigid depending what yarn you use.


The heartland yarn worked up beautifully for this, and the color choices they have in that line are all gorgeous! I definitely recommend using that yarn or something similar like Caron Simply Soft so you end up with a flexible beanie vs. a stiff one.


Materials:
1 skein Lion Brand Heartland yarn
J/6.00mm hook
Tapestry needle & Scissors
Faux Fur Pom Pom

Amazon Picks:


Pattern notes:

Beanie is made from the brim up

The foundation double crochets in the beginning of the pattern are necessary to make the brim stretchy.

When working on a row for the main portion, you should be making front post double crochets on top of back post double crochets and vice versa.

In case you need to put down your work in the middle of a row - know that the front post double crochets will look raised when looking at it from the front and the back post crochets will look sunken in.

Gauge: 4” x 4” = 12 st x 7 rows in DC

Abbreviations (US terms):
Ch = chain, dc = double crochet, fpdc = front post double crochet, bpdc = back post double crochet, st = stitch(es), dec = decrease

Pattern:
Round 1: Make 66 foundation dc, join to first dc (use tapestry needle to weave and sew bottom of dc stitches together)
Round 2: Ch 2, *FPDC, BPDC, repeat from * around, join to first DC
Round 3-6: Repeat Round 2
Round 7: Ch 2, *BPDC, FPDC, repeat from * around, join to first DC
Round 8: Ch 2, *FPDC, BPDC, repeat from * around, join to first DC
Round 9-18: Repeat Round 7 and 8
Round 19: Ch 2, *dc in next 3 st, dc dec, repeat from * around, join to first dc
Round 20: Ch 2, *dc in next 2 st, dc dec, repeat from * around, join to first dc
Round 21: Ch 2, *dc in next st, dc dec, repeat from * around, join to first dc
Round 22: Ch 2, dec around, join to first dc
Fasten off, leave tail to sew up hole.

Add pom pom to top of beanie.


Labels: ,

Tuesday, December 5, 2017

Quick & Easy Chunky Cowl - Free Crochet Pattern

GET THE FREE PDF DOWNLOAD PATTERN FOR THIS QUICK AND EASY CHUNKY CROCHET COWL THAT USES ONE CARON TEA CAKE DOWN BELOW.


If you've been around, you know I love Caron cakes - especially the bulky weight cakes that they came out with this past summer! I made an easy, chunky cowl using one of the Caron Tea Cakes and it's so incredibly squishy - you're going to love it!

Look at that color. Look at that squish. I used the same stitches I used for my Poppy cardigan and I think the pairing of treble and half-double crochets just make for the perfect texture.


I got the idea of alternating and pairing the treble and half-double stitches together from the grit stitch. The grit stitch is similar as it alternates between two basic stitches - double crochet and single crochet. I love the grit stitch too, but I thought maybe if I paired 'larger' basic stitches, I would get even more texture - and the results definitely delivered!

As for the color of this scarf, it's absolutely perfect. It's a mix of earthy neutrals and will be matching what ever outfit I plan to wear.


As a lover of infinity scarves, I have to say - this cowl might just be my new favorite.  It's now typically chosen over my other infinity scarves when I need something to keep me warm before stepping out the door.

 It's so easy to throw on and I don't have to worry about wrapping it around twice and adjusting it. Just pop it on and go!

GET THE FREE PDF DOWNLOAD HERE.

PIN IT TO YOUR CROCHET BOARD ON PINTEREST


WANT MORE FREE PDF DOWNLOADS? CLICK HERE

Materials
1 skein Caron Tea Cake (English Breakfast)
9.00mm hook
Stitch marker
Tapestry needle
Scissors

Pattern notes
Cowl will be made in rows then the short ends will be sewed up.
Beginning chains in row will count as a stitch, so the following st made will not be made
in the same space as ch
Stitch markers will help identify first/last st in the row
Gauge: 4” x 4” = 7 st x 5 rows alternating tr and hdc st
Dimensions: 32” x 8”
Abbreviations (US terms)
Ch = chain, hdc = half-double crochet, tr = triple crochet, st = stitch(es)

Pattern:
Row 1: Ch 56, hdc into 5th ch from hook, *tr, hdc, repeat from * across, turn
Row 2-10: Ch 4 (counts as st), hdc, *tr, hdc, repeat from * across, turn
Fasten off and leave a tail to sew up the short sides. Weave in ends

Labels: , ,

Sunday, December 3, 2017

Snowman Amigurumi Crochet Pattern - Part 3


Part 3 

I hope you have enjoyed making the snowman thus far! This week will be easy peasy as we work on his accessories and arms.

If you haven't done Part 1 and Part 2 - you can find them along with all the information of the crochet along here.

If you haven't already, I'd love if you would join my Facebook group and share your work. Feel free to ask any questions when you're there! The group is super helpful, encouraging, and kind!

If you would like to work ahead or would like a printable PDF copy of the pattern, you can purchase it on Ravelry here.

Full Materials List

Worsted weight yarn in white (approx 215 yards) - I used 1 skein Loops&Threads Impeccable
Worsted weight yarn in red, green, orange, brown, and black (small amounts) for snowman accessories, face, and arms
G/4.00 mm hook
H/5.00 mm hook
1 pound poly-fil fiber stuffing
(2) 1" buttons and needle&thread to attach
(2) 12mm safety eyes
1 pipe cleaner cut in half
Tapestry needle
Scissors
Stitch Marker (optional - can substitute by using a piece of yarn)
Pom pom maker (optional)

Gauge 2” x 2” in SC = 9st x 10 rows in SC

Pattern Notes

Snowman will be worked from the bottom up.

Rounds of the snowman will be worked in a continuous round.

Use stitch marker/piece of yarn to mark what round you are on.

Snowman will be stuffed as you work. (Pattern will tell you when to stuff.) Stuff as much as you can as the poly-fil will tend to settle.

Invisible sc decrease: work a regular sc decrease except work them in the front loops only, this will create a cleaner look.

Abbreviations
MR = Magic ring, Ch = chain, SC = single crochet, DC = double crochet, st = stitch(es), invisible sc dec = invisible single crochet decrease, FPDC = front post double crochet, BPDC = back post double crochet

Pattern 

(continued from Part 2)

Hat - Using green yarn and H/5.00mm hook

Round 1: Ch 36, join to first ch to make a ring
Round 2: Ch 2, DC around, join to first DC
Round 3: Ch 2, *FPDC, BPDC, repeat from * around, join to first DC
Round 4-8: Ch 2, DC around, join to first DC
Fasten off. Using tapestry needle, weave in and out of top stitches and pull tight to close up the hole. Knot and weave in ends.

Make ~2” pom pom using a pom pom maker OR wrap white yarn around 3 fingers at least 100 times. Carefully take yarn off fingers and using a piece of yarn about 6”, tie the center so there are loops on both side. Once secured tightly, cut loops on both side. Trim and fluff pom pom as needed and attach to top of hat.

Scarf - Using red and green yarn and H/5.00mm hook

Ch 54, DC into 3rd chain from hook and across. Fasen off and weave in ends

Add fringe with green yarn to both ends of scarf. Tie around snowman’s neck.

Arms - Using brown yarn, G/4.00mm hook and pipe cleaner

Cut the pipe cleaner in half to make two arms.

Make a slip knot with the yarn and sc around the pipe cleaner leaving about 1” of the pipe cleaner “uncrocheted”.

Make two arms. Stick uncrocheted sides of pipe cleaner into the sides of the snowman and curl the ends to make little fists. Bend arms as desired.


I hope you enjoyed making this snowman! It was a very fun project for me - I love how much character he has :) Please share with me your creations either on my Facebook group or Instagram!

Labels: ,

Friday, December 1, 2017

Here is your chance to win some Caron cakes! One of my favorite yarns to work with.


To celebrate my blog starting one year ago (Happy Birthday to Maria's Blue Crayon!), I'm giving away from of my favorite yarns!

One lucky person will receive two skeins of Caron Big Cakes and two skeins of Caron Tea Cakes.  There's a lot you can do with this yarn! 

I made the Cookie Crumble Shrug, a Chunky Infinity Scarf, the Tea Cake Scarf, and the Granny Filet Afghan with Caron cakes. (And I even have another pattern to release using a Tea Cake!)

Caron Big Cakes 

Caron Tea Cakes

Enter to win this yummy yarn and tell your yarn friends!

You have until December 14th 11:59pm (EST).


Once a winner is picked, I will contact that person December 15th and will ship out ASAP in hopes of receiving before Christmas!

**Anyone can enter, but please know that if you are living outside the U.S. and win the yarn, you may be subjected to other fees upon retrieving the package.**


a Rafflecopter giveaway

Labels: